
Web/mobile push: Push campaigns
Overview
There are few types of push campaigns that you can send in PushPushGo.
- Web/mobile push
- RSS (web push)
- Follow-up (web push)
- AB test (web/mobile push
In this section we cover how to manage web/mobile push campaigns, if you would like to read more about technical details go to Web/mobile push: Introduction and core concepts.
Create push campaign
From Dashbaord, go to New Web/Mobile push.
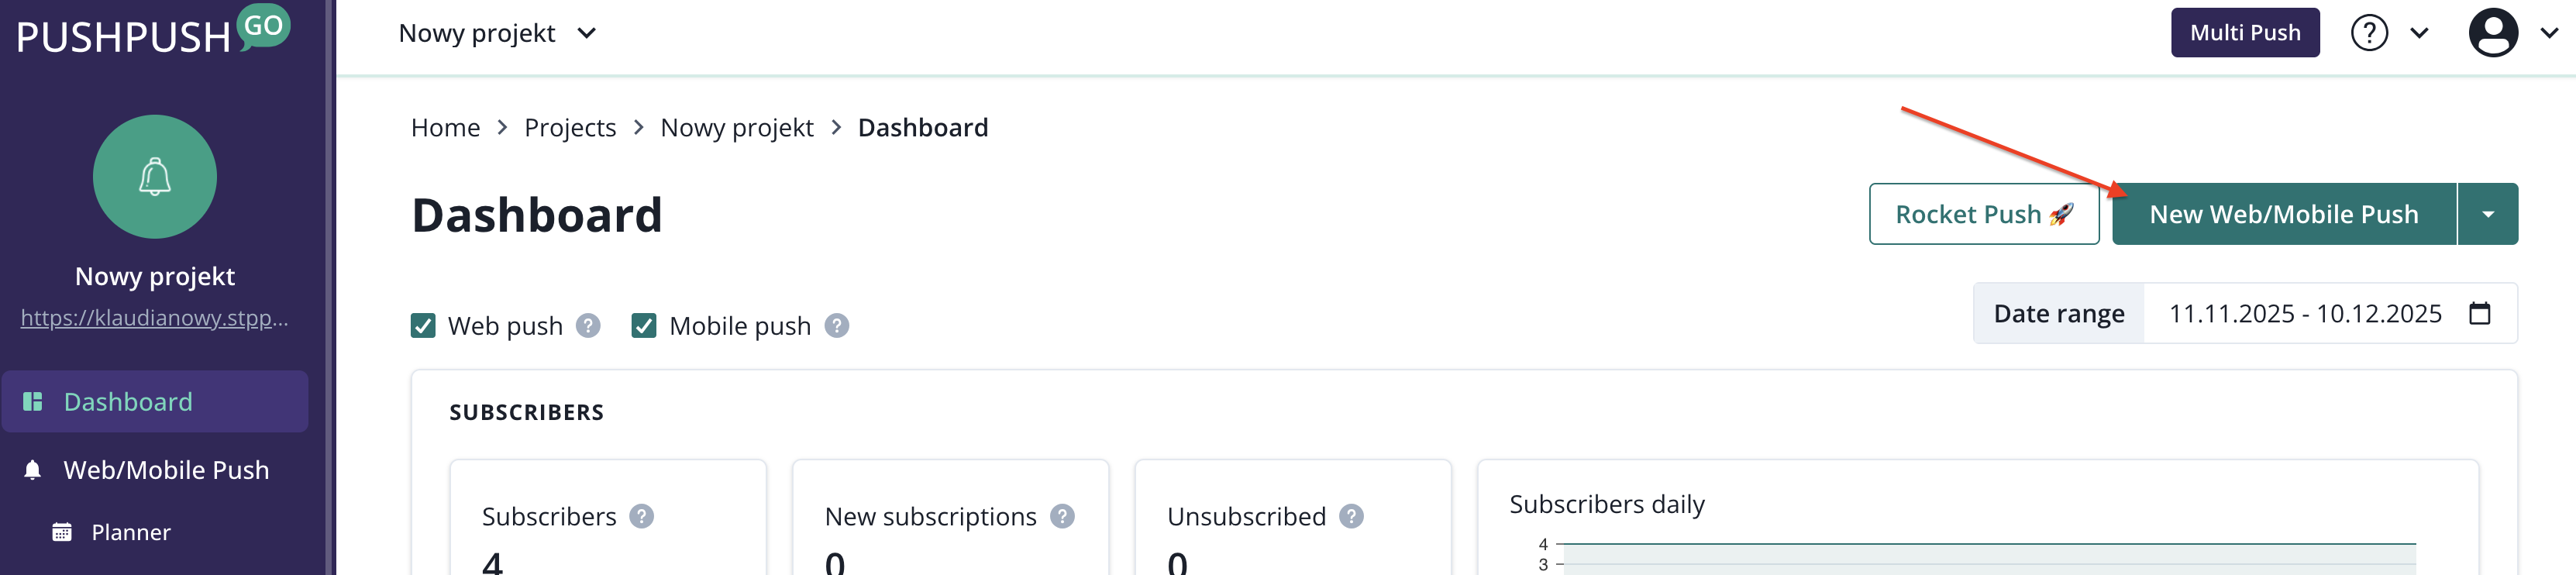
Now, you are inside the push creator
To setup the campaign you will need to complete three steps:
- fill in the content,
- choose the audienc,
- pick the sending time.
You can save the campaign as a draft and accept it later, or schedule the sending right away.
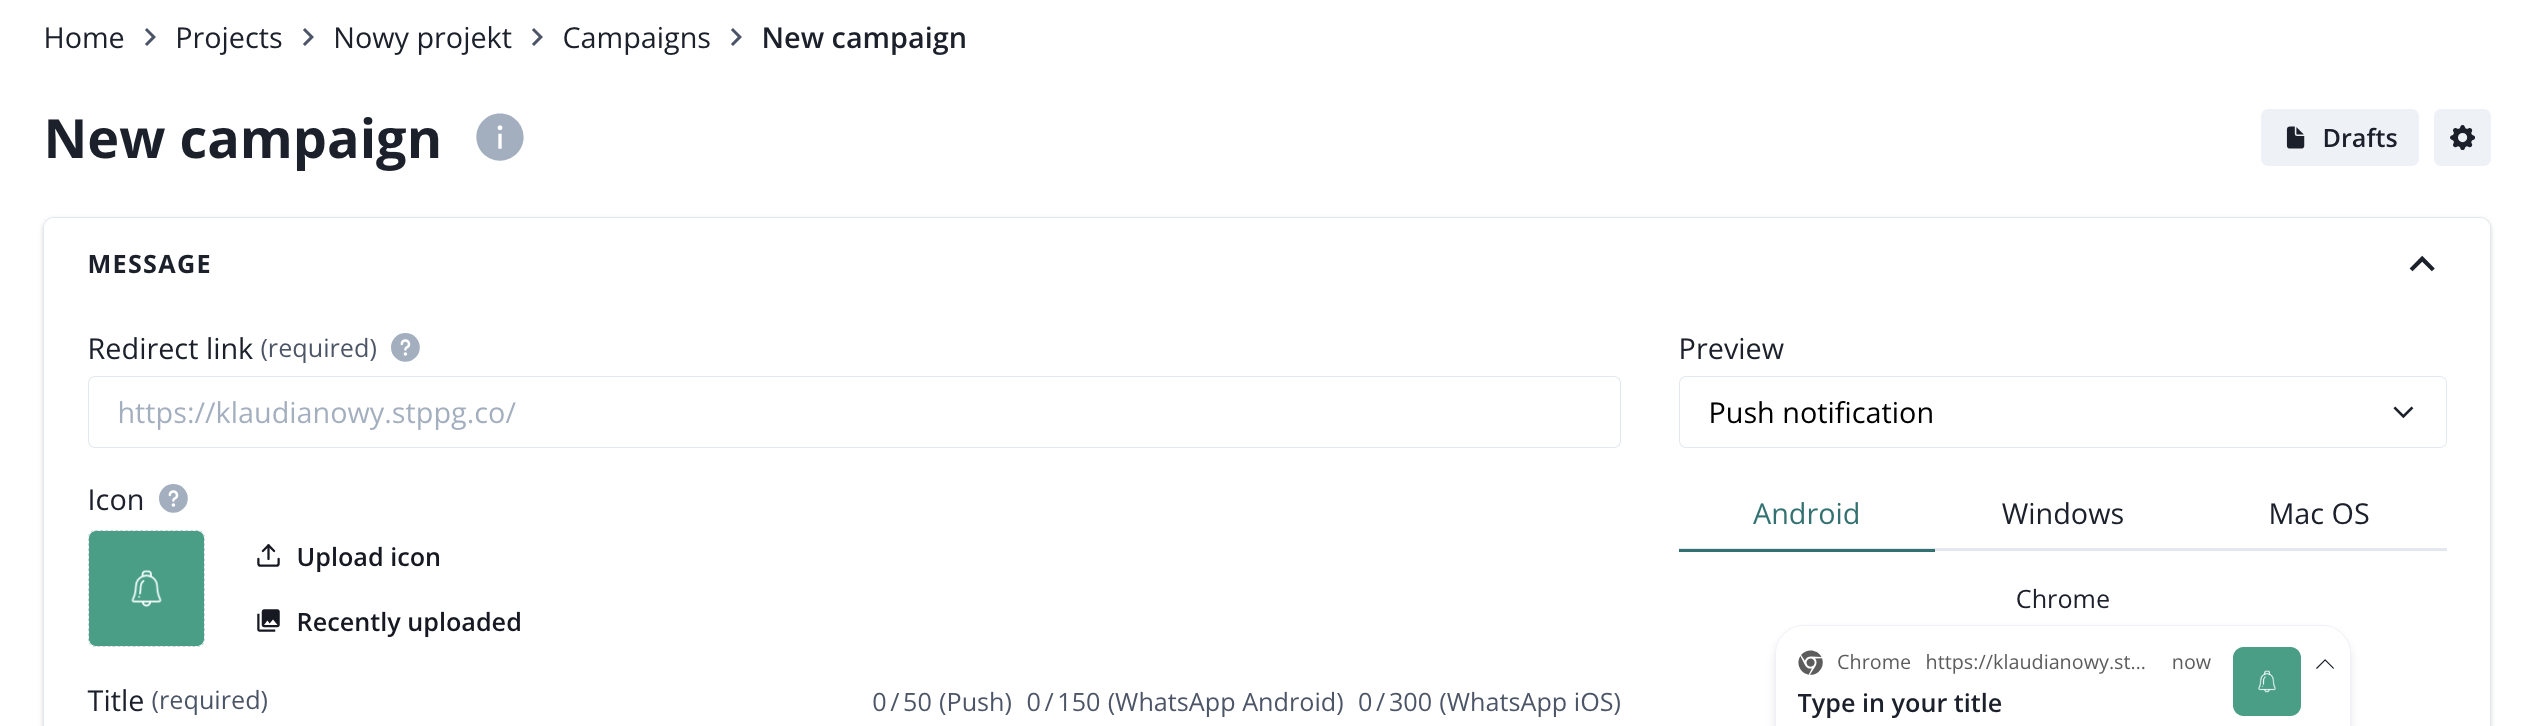
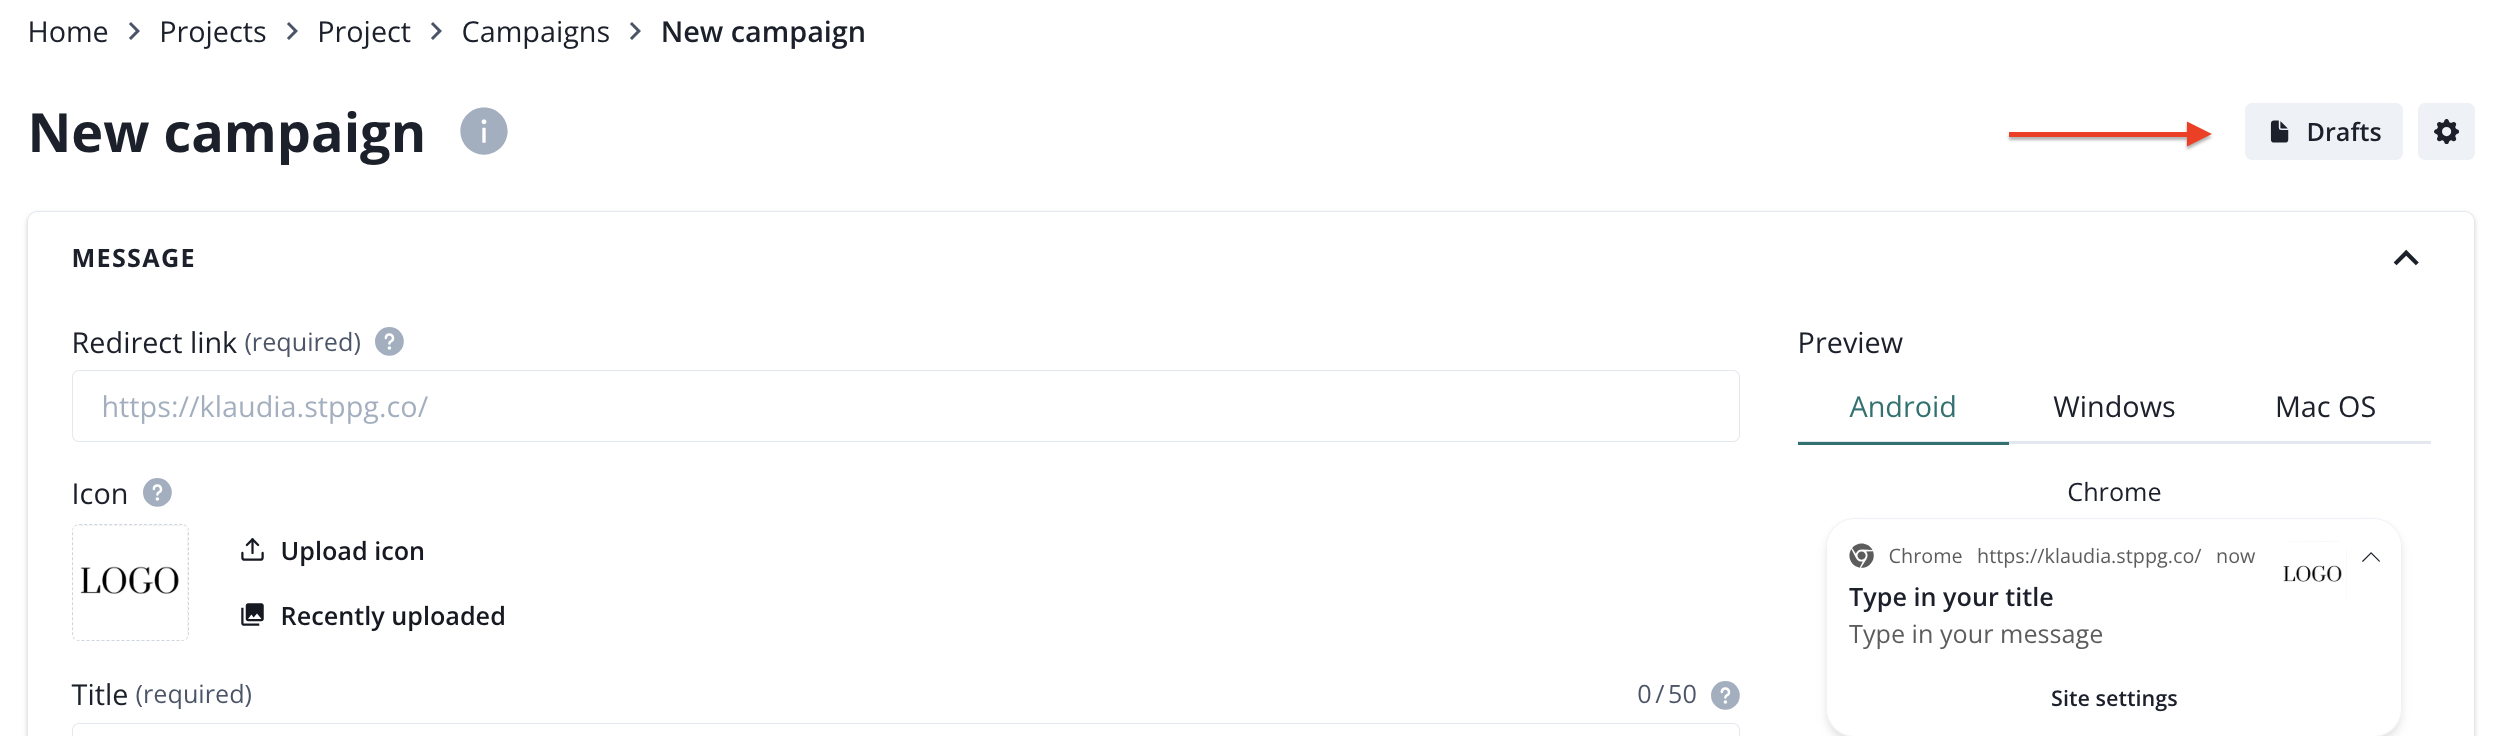
Push camapign content
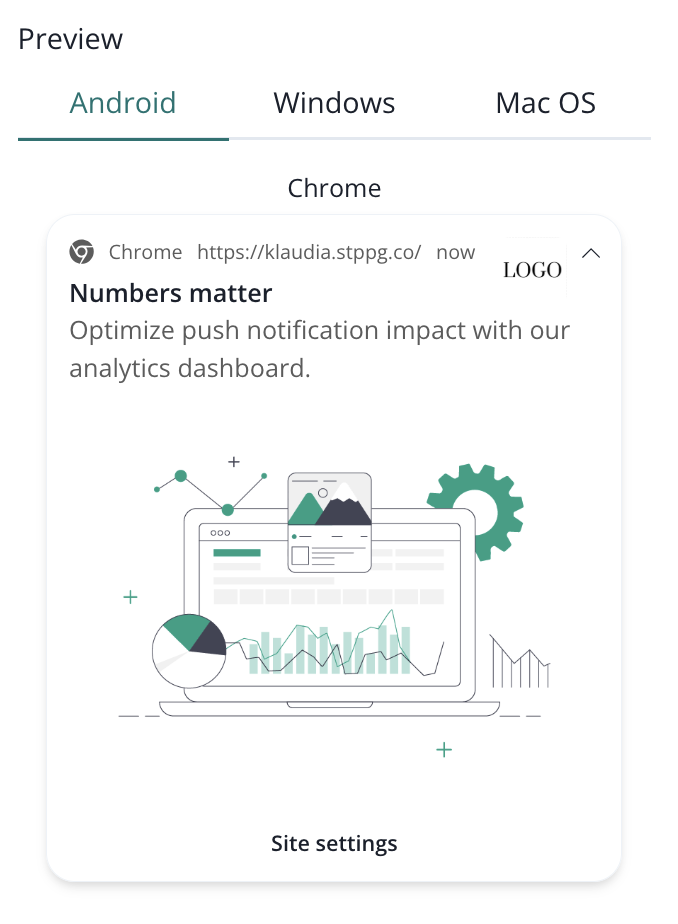
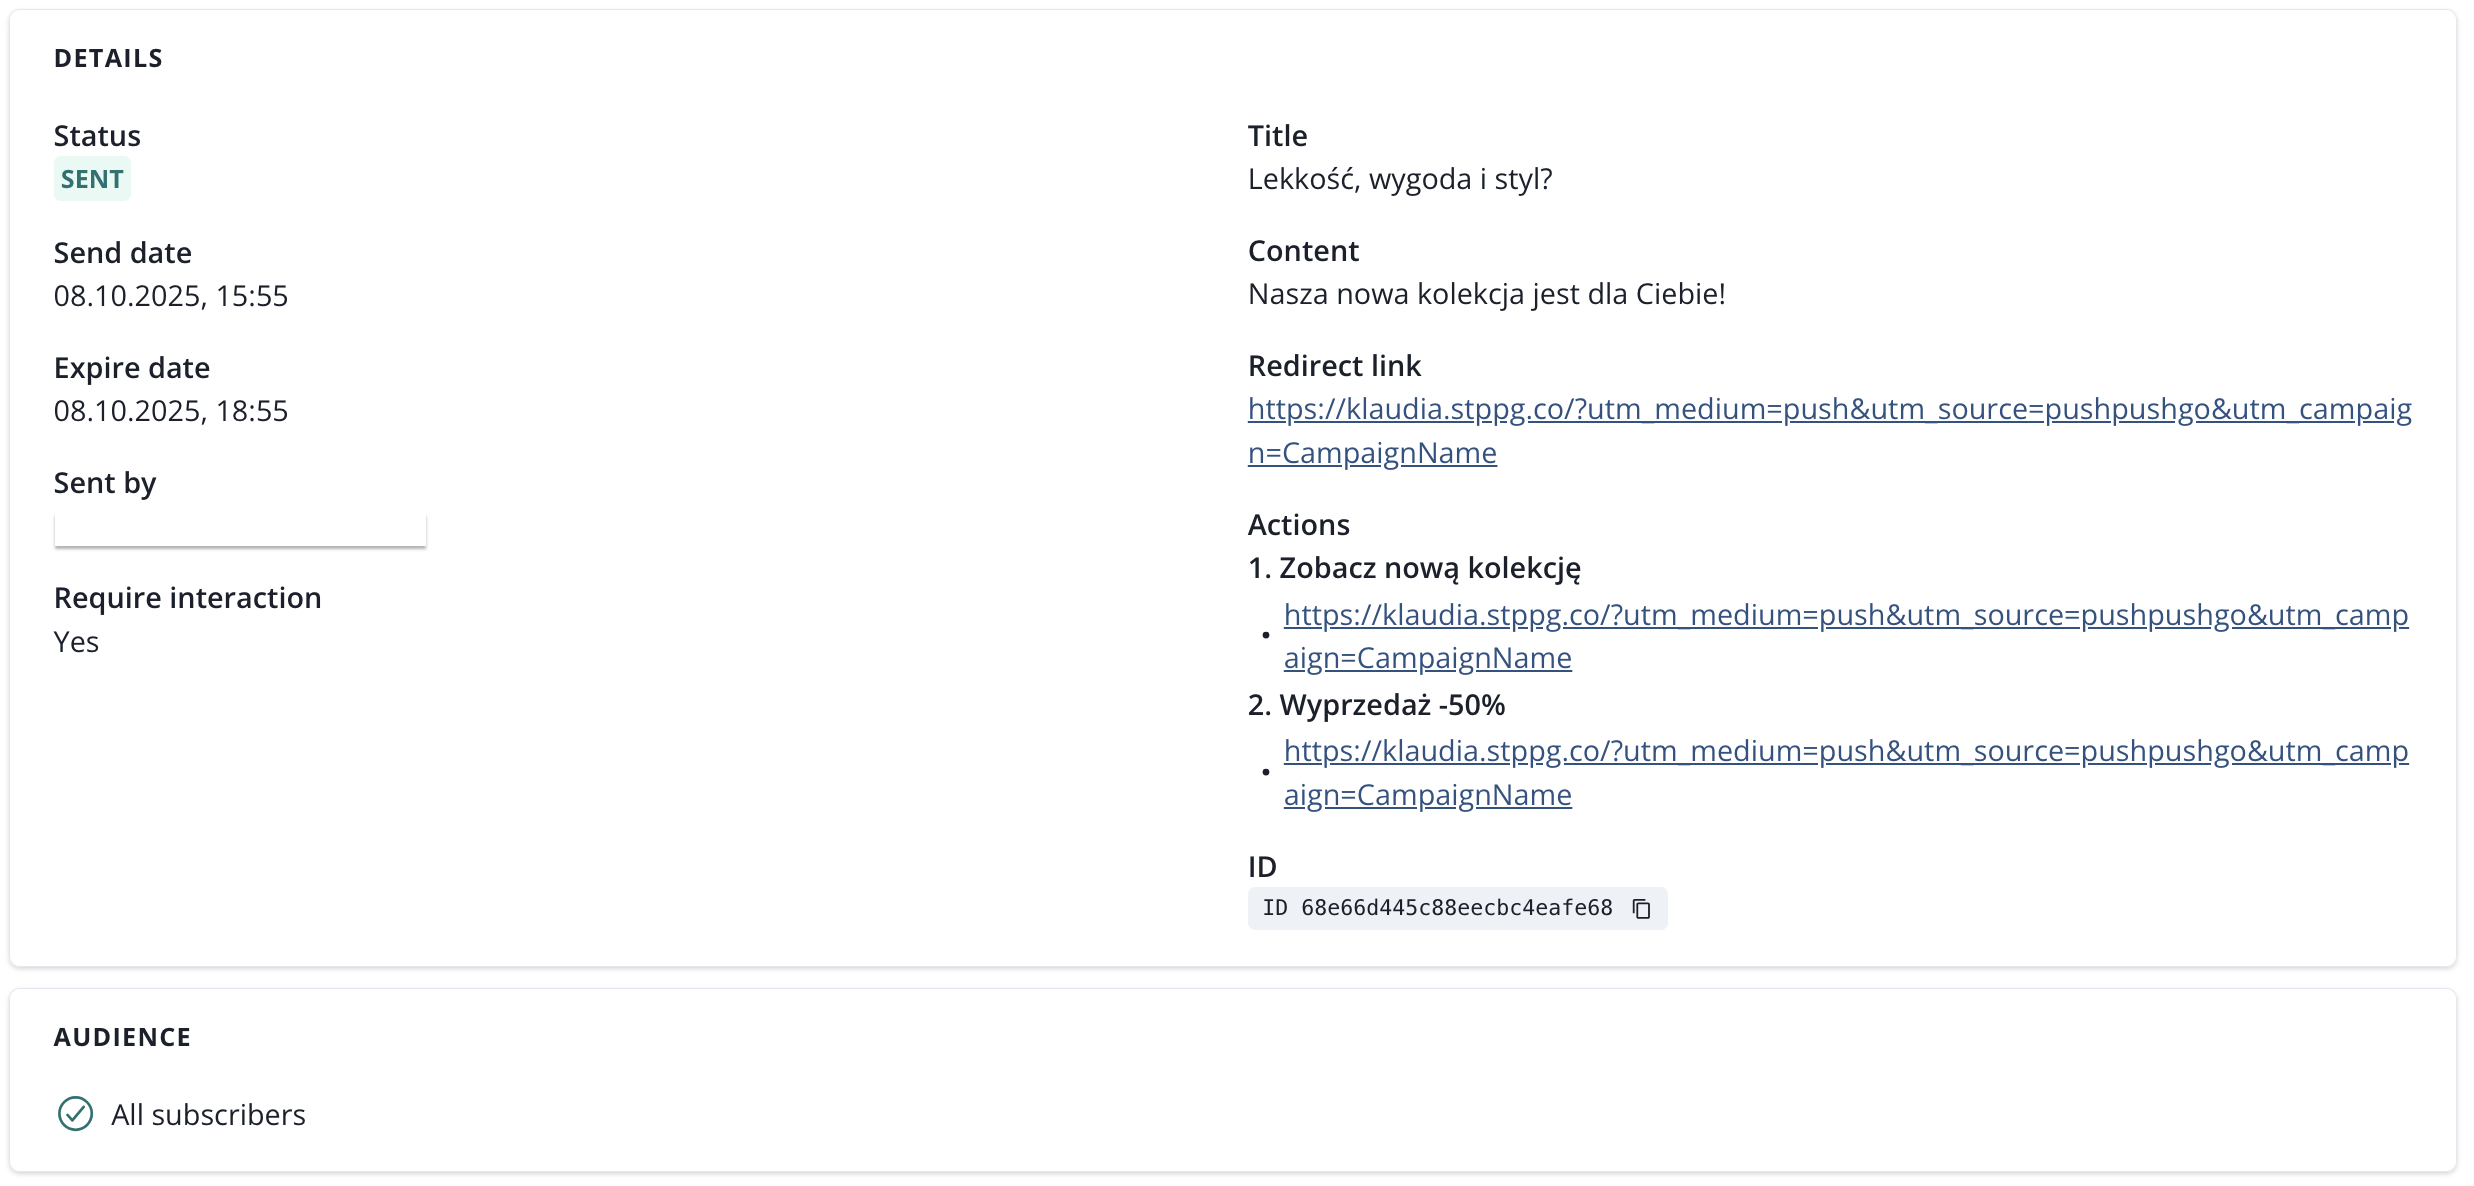
A campaign must include a title, content, a link, and an image. You can also add up to two action buttons and a large image.

The requirements for each field are as follows:
- title - max. 50 signs, can't be empty.
- content - max. 150 signs, can't be empty.
- redirect link - has to be a correct URL address, to which the subscriber will be transferred after clicking on a notification.
- icon - downloaded from the project's logo. The default app icon will be used if a logo is not defined.
- image - optional.
- action buttons have a title and URL addresses that take the subscriber to the correct page when clicked.
- require interaction - if you choose that option, the notification will not be hidden until the subscriber interacts with it.
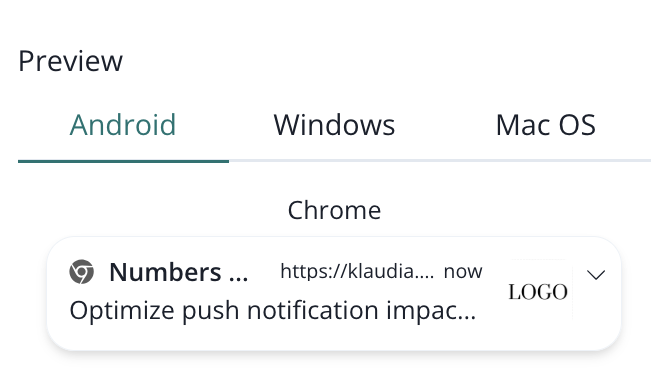
After you finish with the campaign content, you can see the preview of your campaign on the right side of the creator
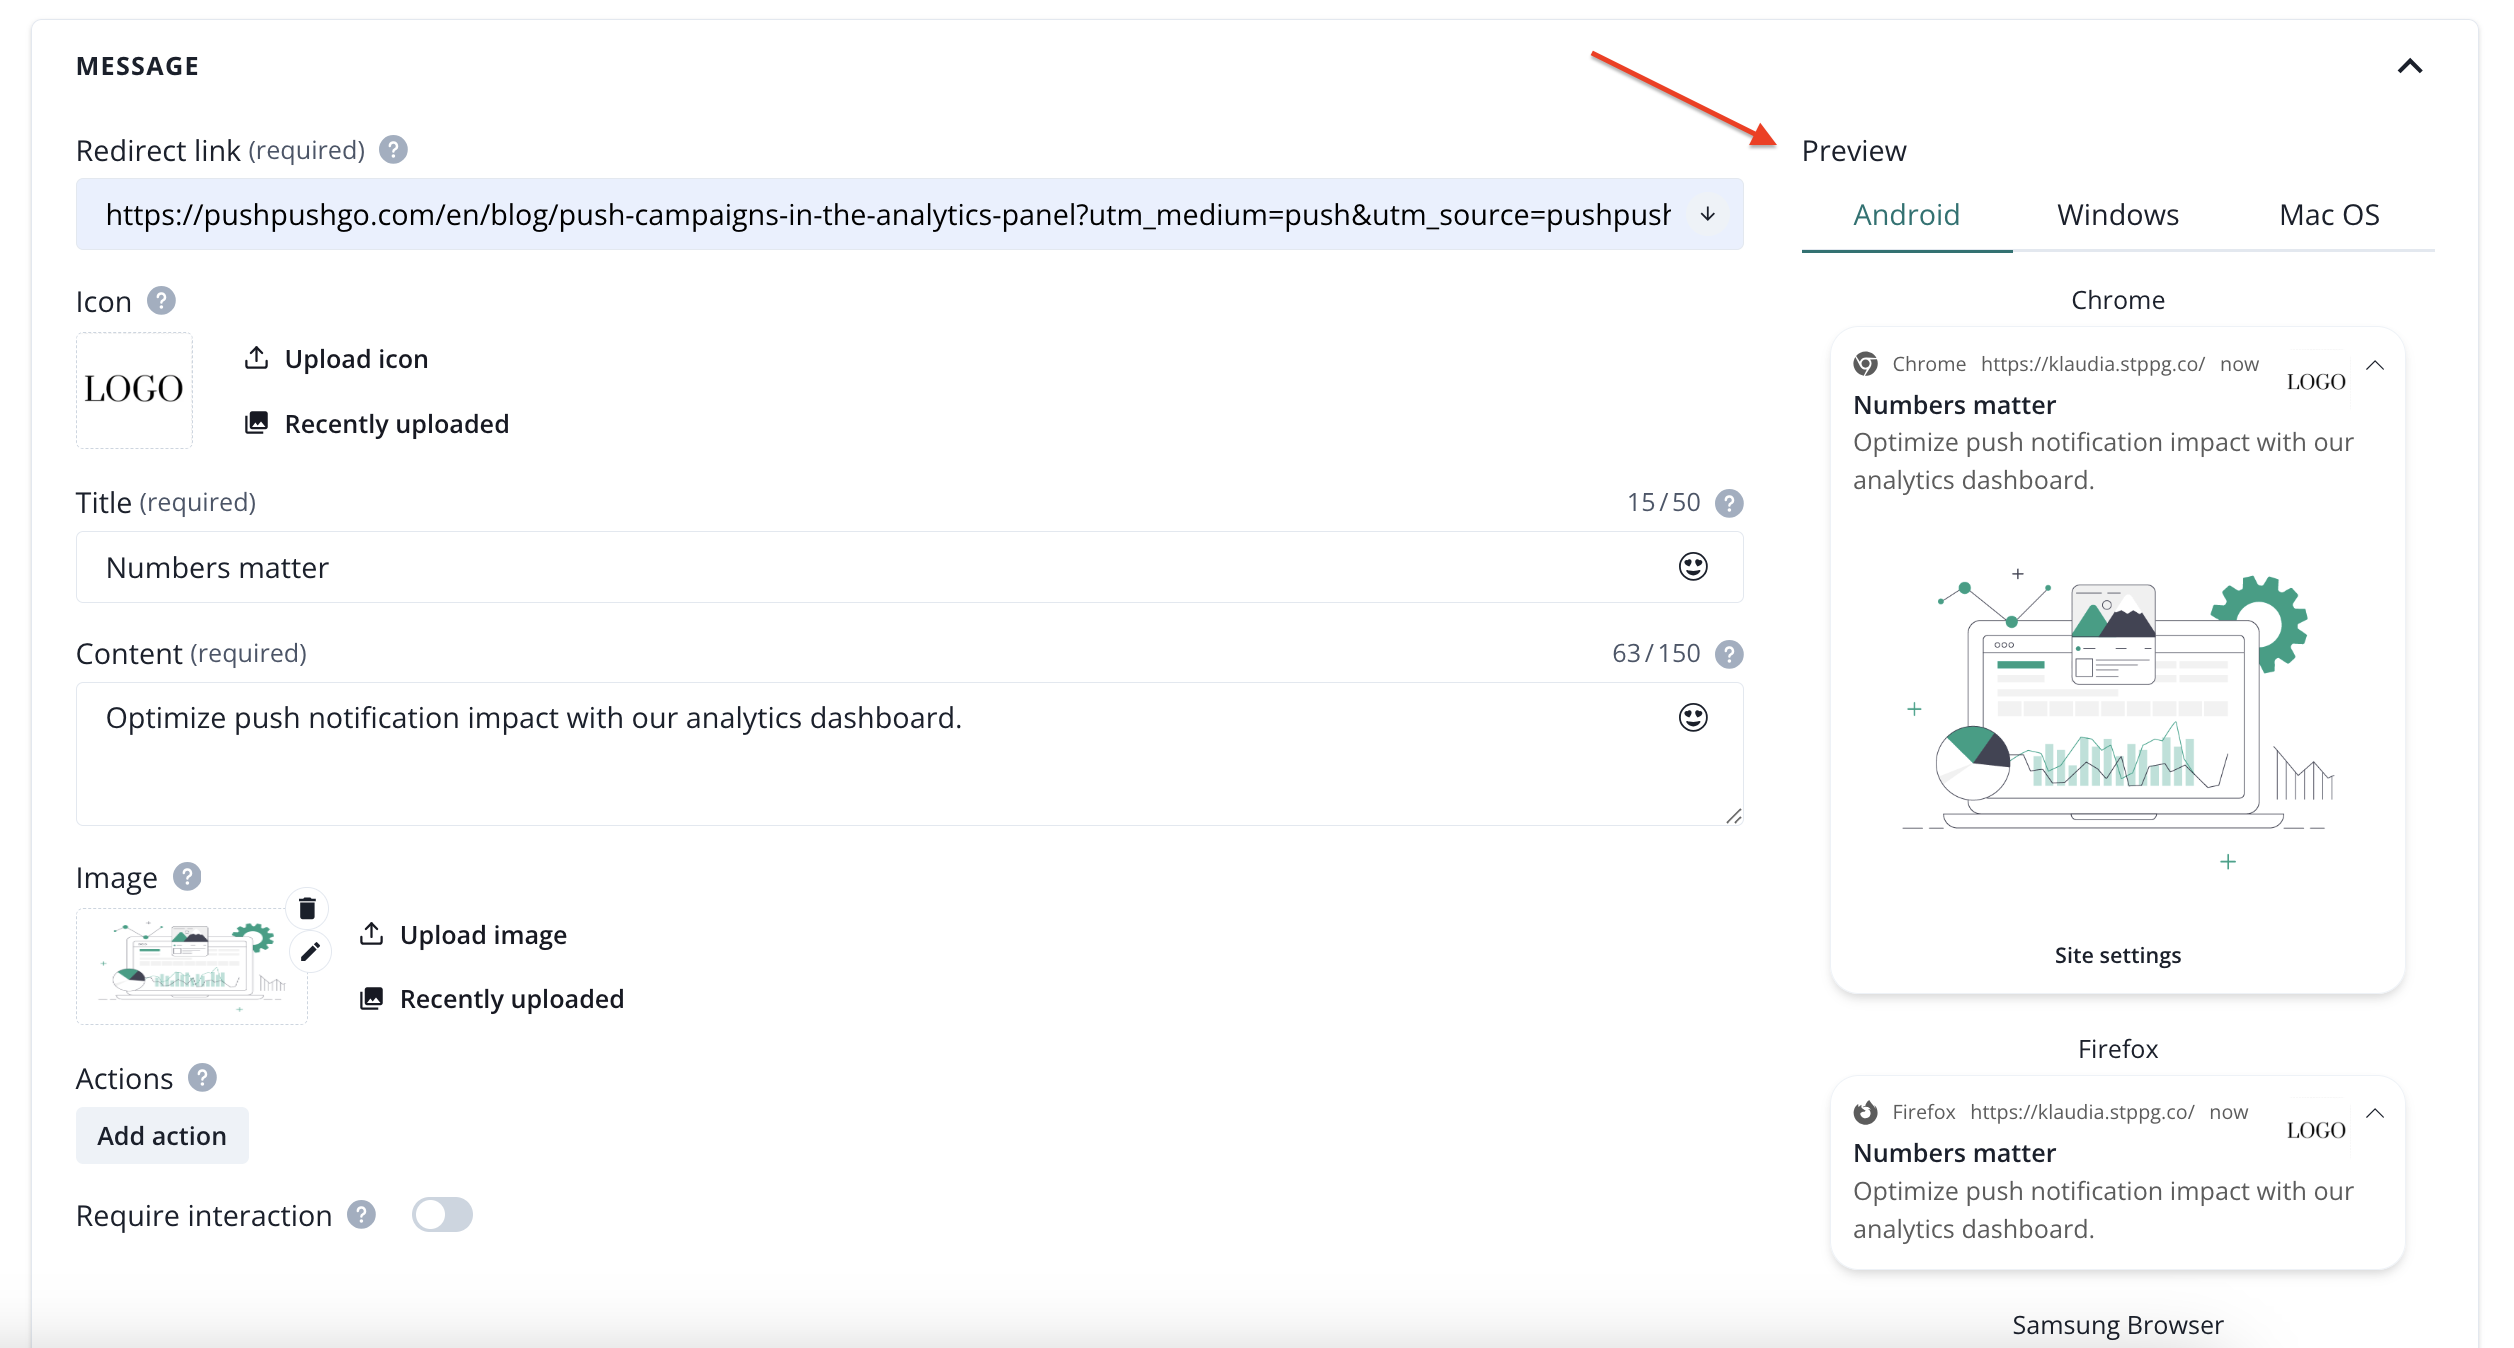
The preview is available for web push notifications on systems: Android, Windows, Mac OS and browsers: Chrome, Firefox, Samsung Browser, Edge, Safari). For browsers that support image, you can preview both versions of the notifiaction folded and unfolded.
Push campaign default settings
Campaign default settings allow to accelerate your workflow. You will find them in the push creator, on the right side of the screen.

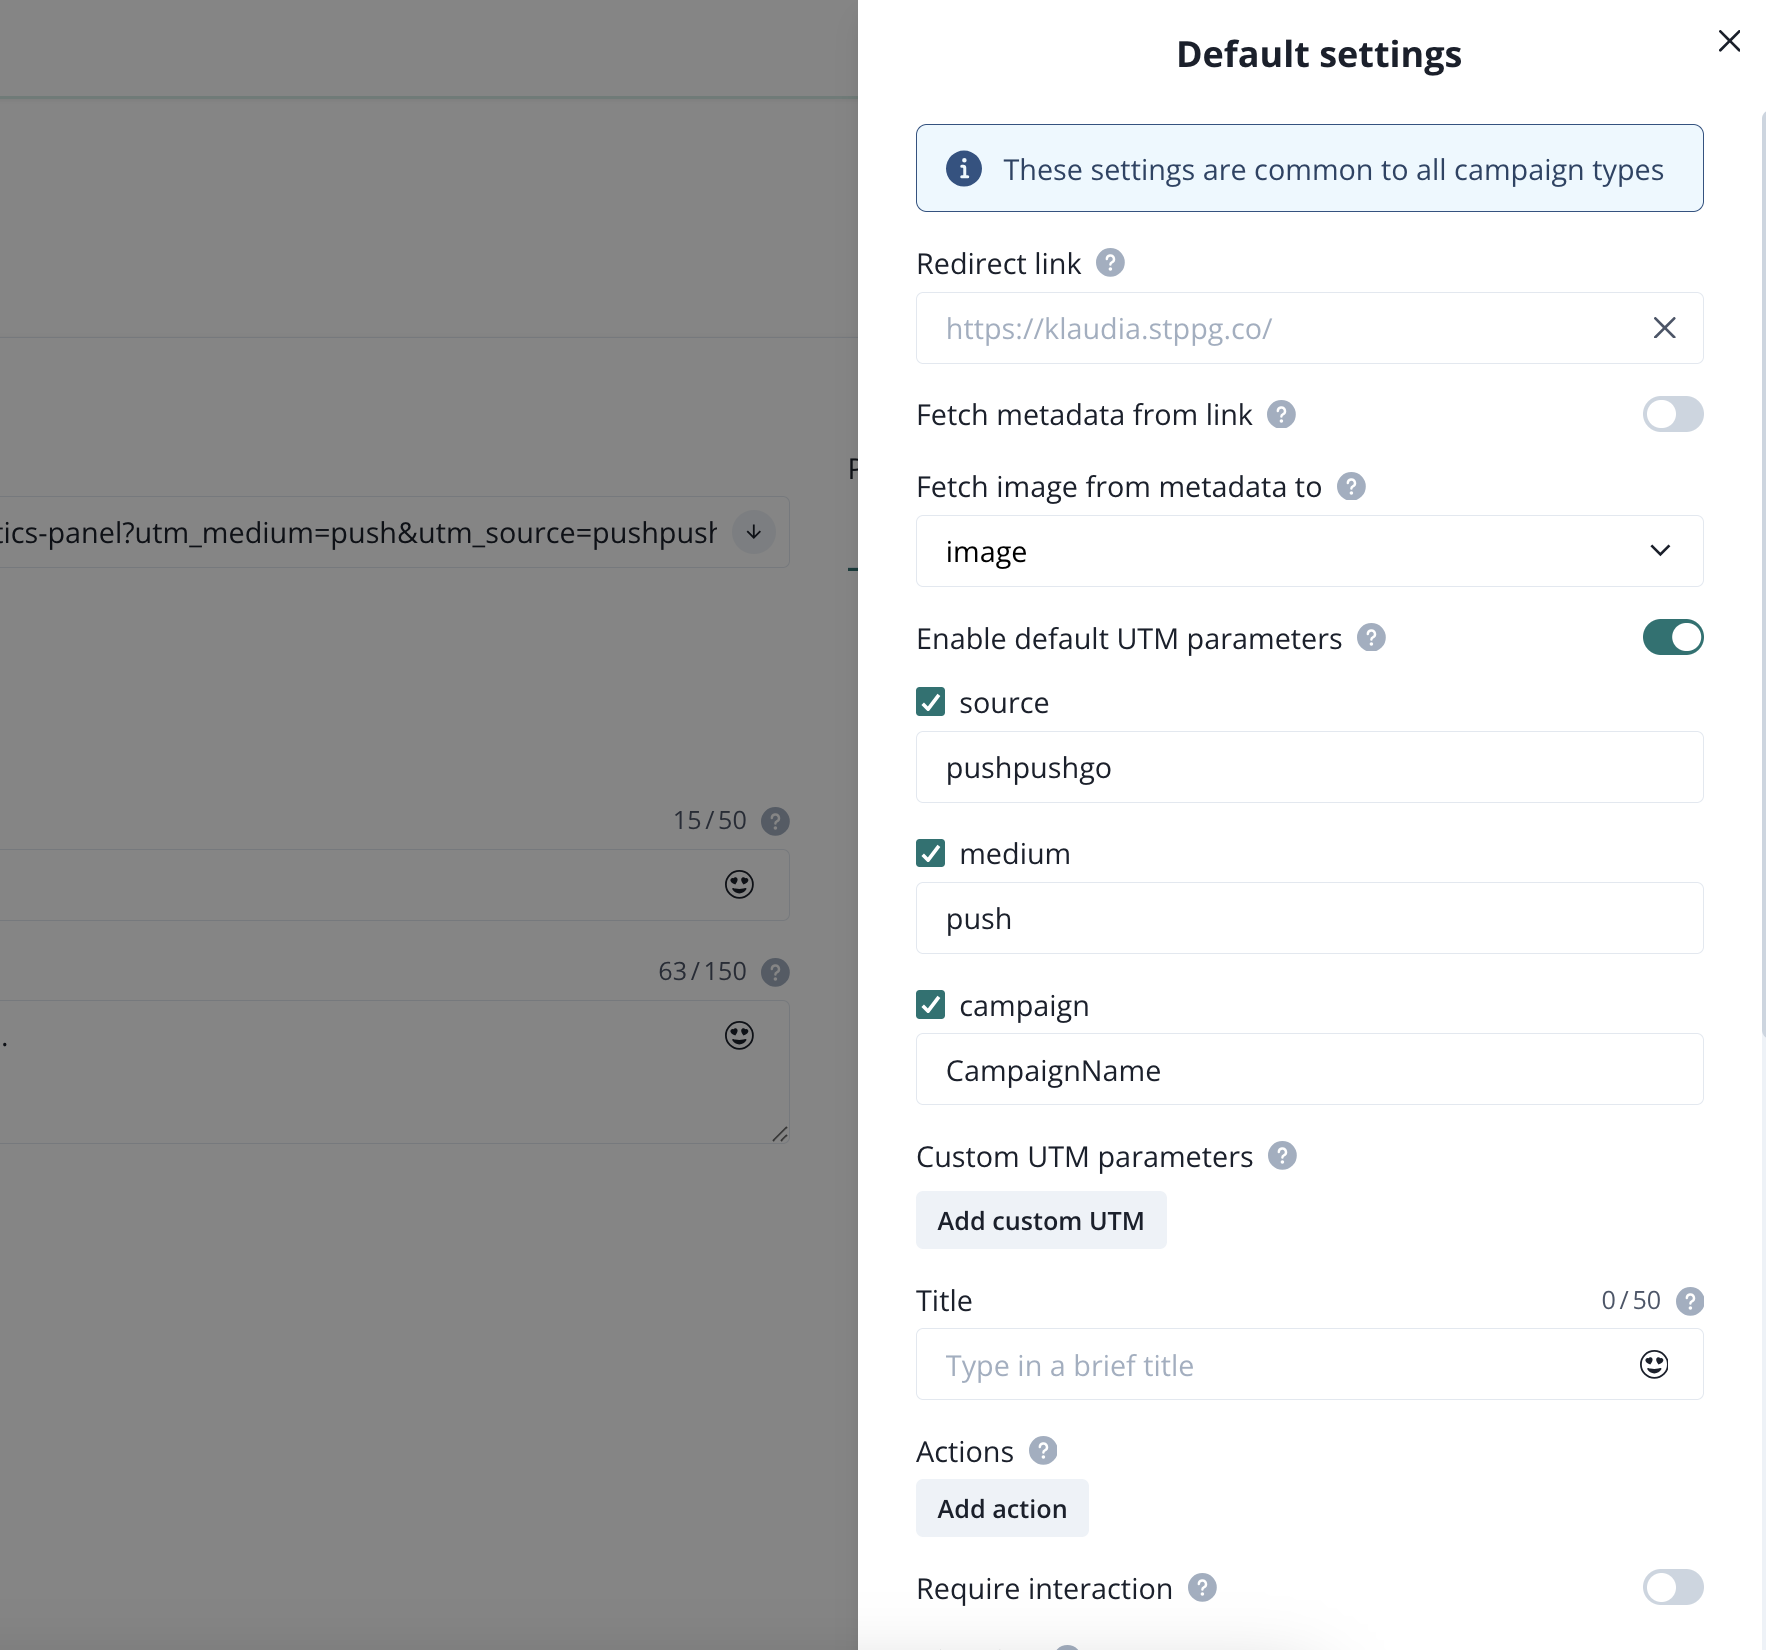
These settings will be applied to all push campaigns types (excluding automation flows), so make sure that this is allined with your strategy.
Push campaign audience
There are few options for segmenting your push campaigns. You can go with
- all subscribers,
- target by segment,
- target by labels.
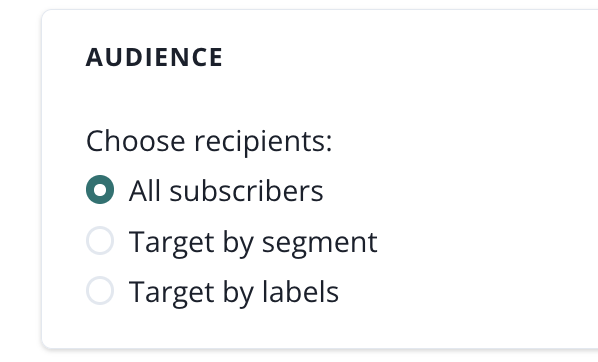
If you choose all subscribers, your campaign will be send to everyone.
In case of projects that are web and mobile projects, it means that the campaign will be sent to your web and mobile subscribers. Configuring deeplinks correctly on your side will result in opening the mobile app for subscribers that have your app installed.
Targeting by segment
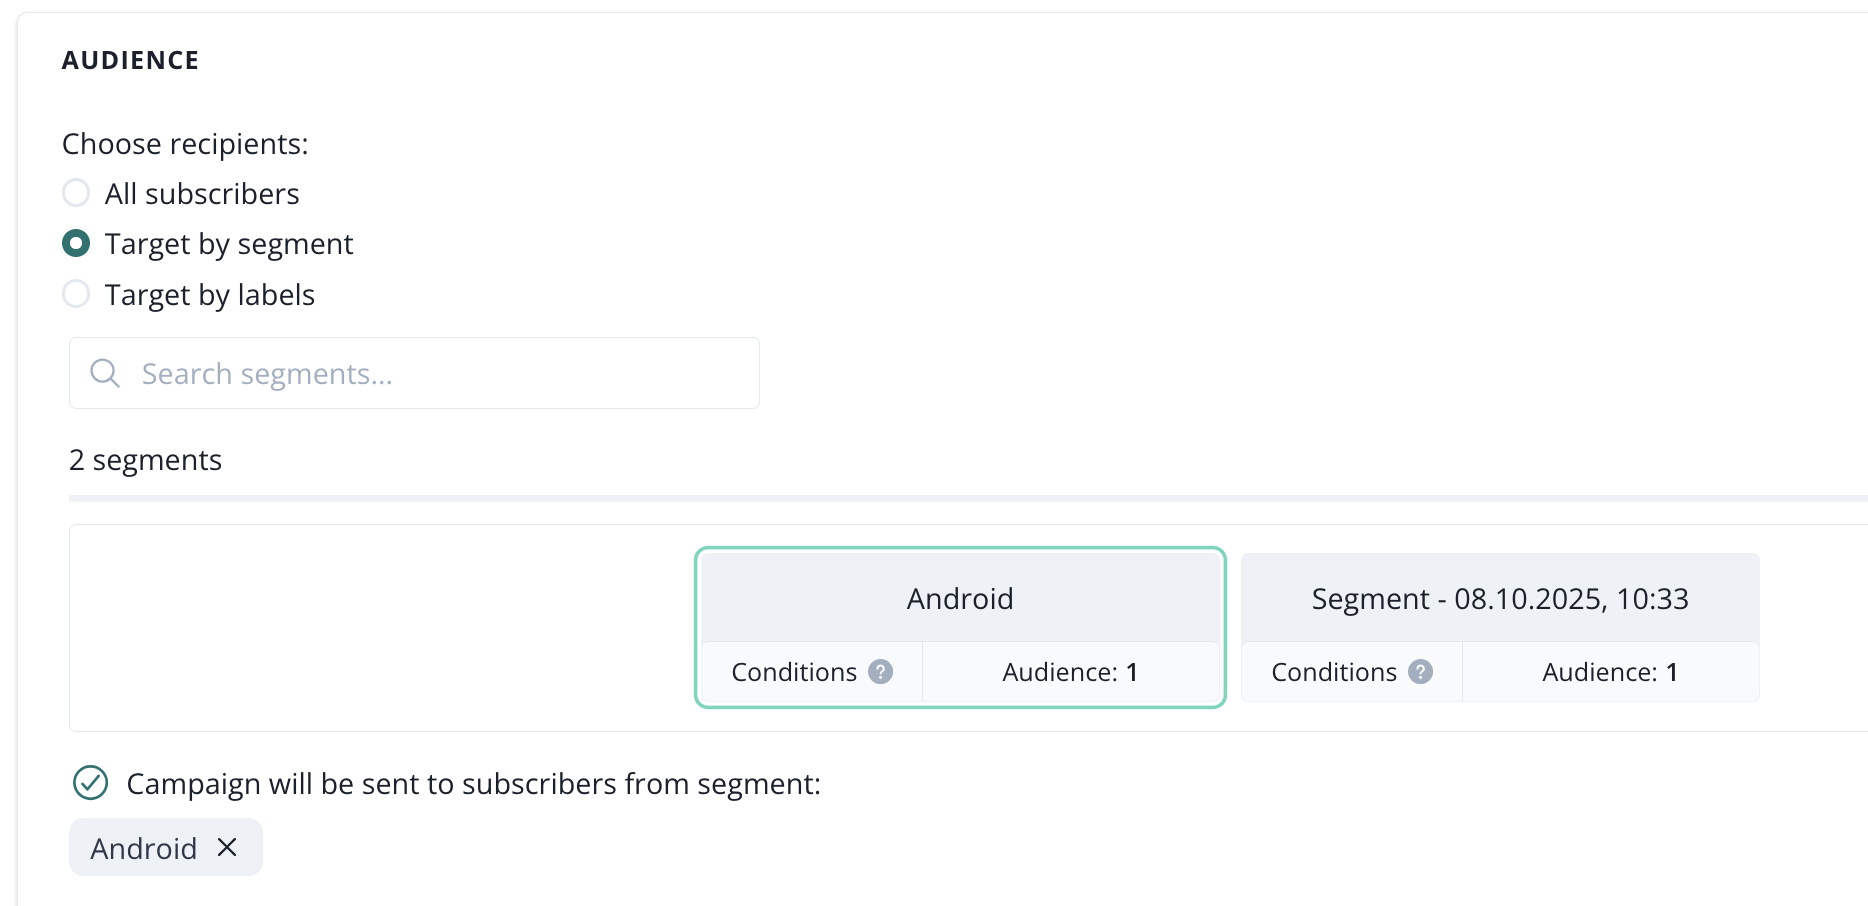
This option is straight forward, you can choose one segment that was previously created in Segments, and the campaign will be sent to every subscriber who meets the conditions of the chosen segment.
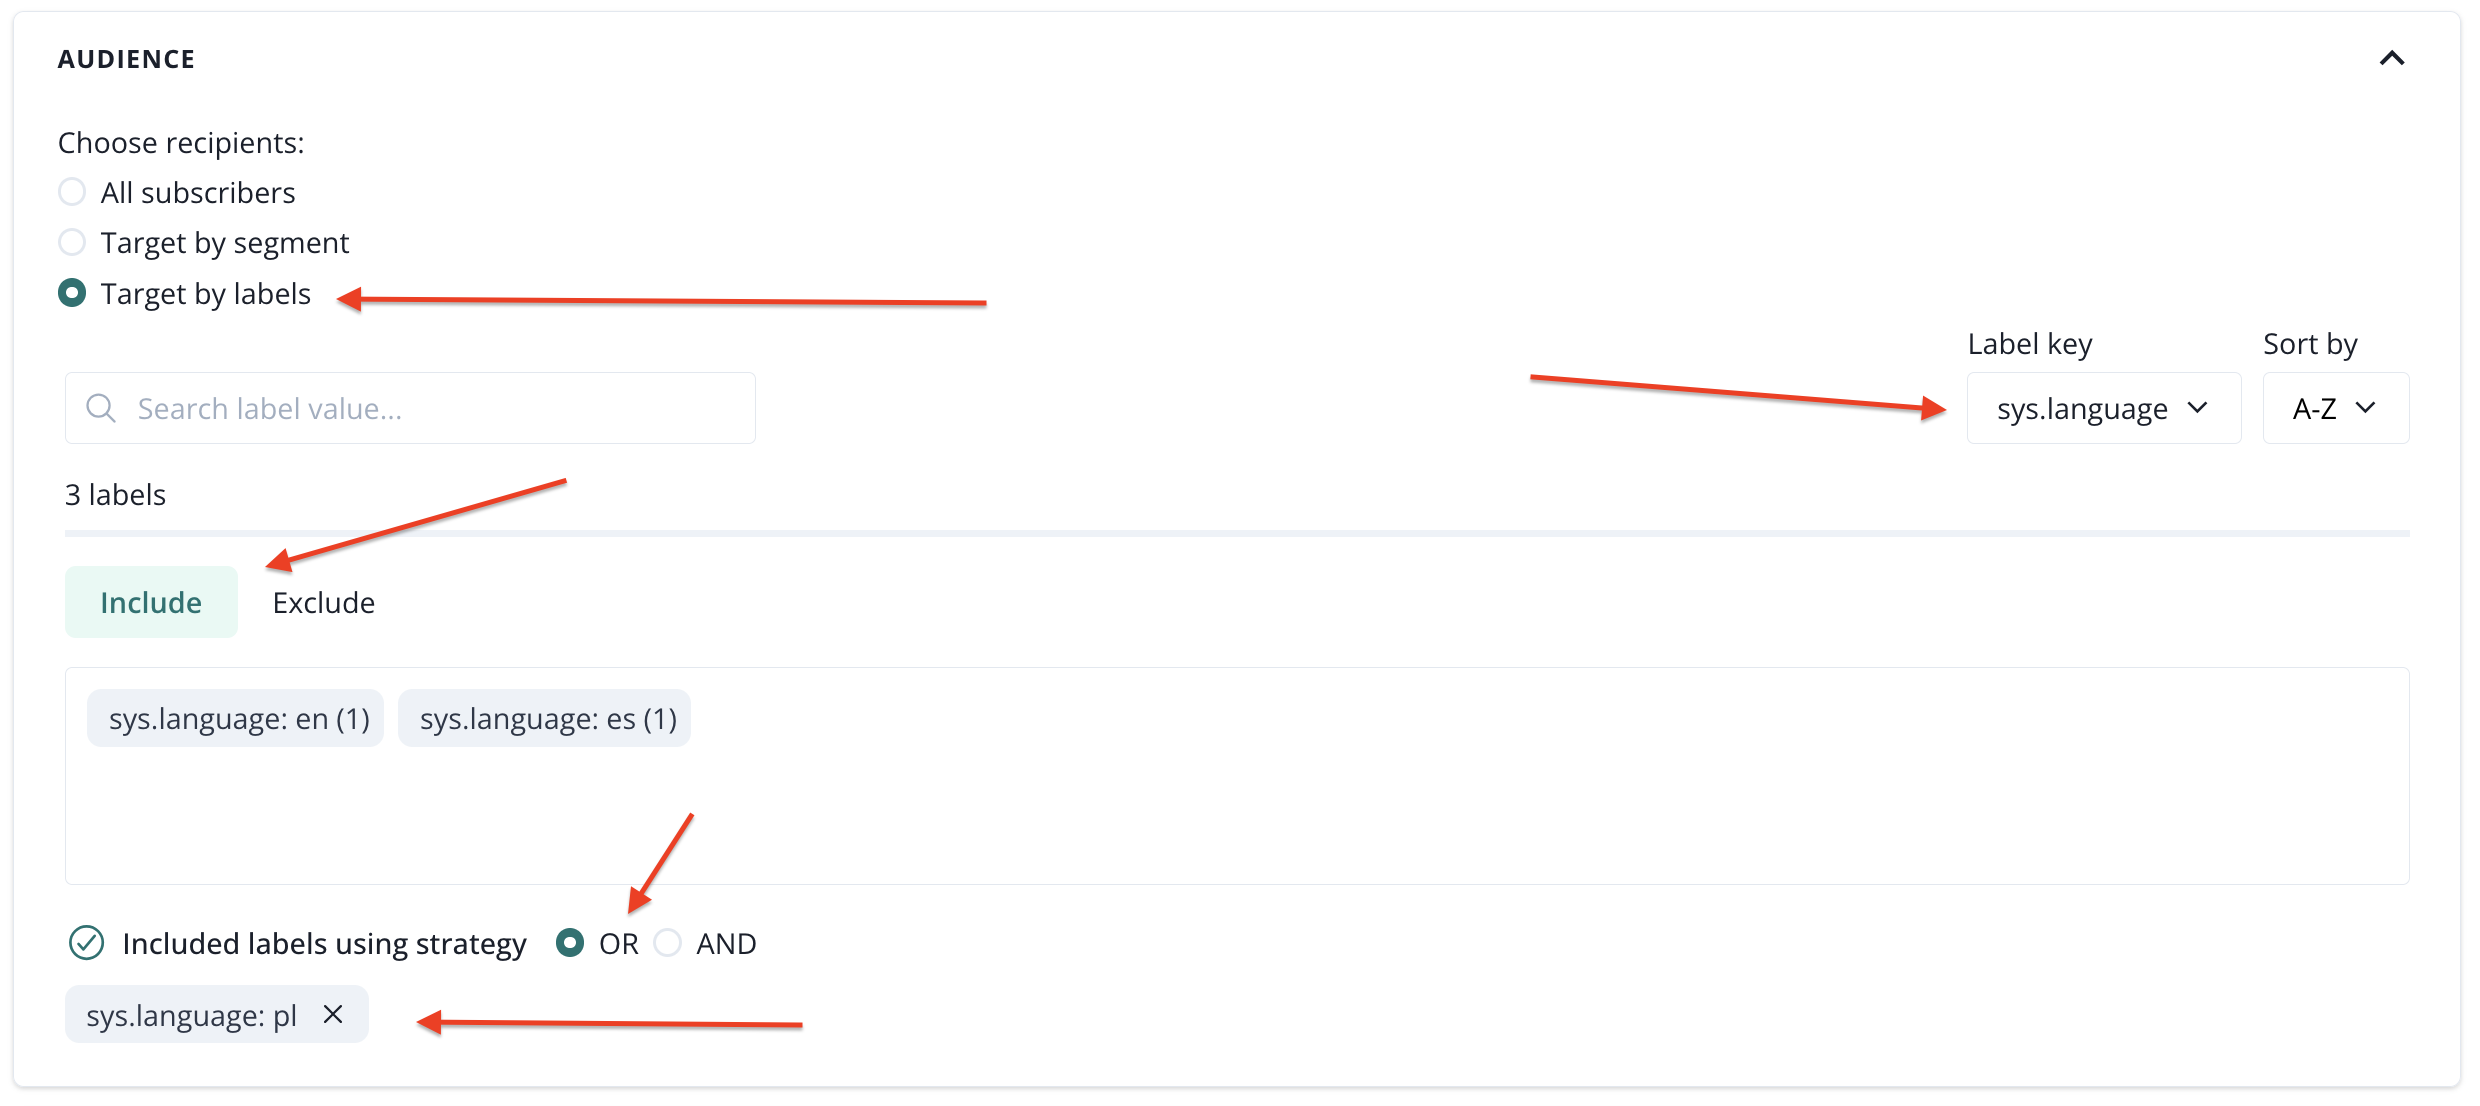
Targeting by labels
When choosing this option, you must first select the label key, to see labels that you want to use for segmentation.

When the label key is selected, you can now decide to include or exclude chosen labels. On the example below we have chosen:
- target by labels
- label key: sys.language
- Include (campaign will be sent to subscribers that meet contidions of the selected label)
- label: sys.language: pl
- labels using strategy: OR (if we would have chosen more labels in this example with the strategy OR, subscriber would have to have at least one of chosen labels to get the campaign)
Push campaign sending time
In this section, you can specify the time of sending the campaign. Choose 'Send now' to apply the default expiry settings and send the campaign right away.

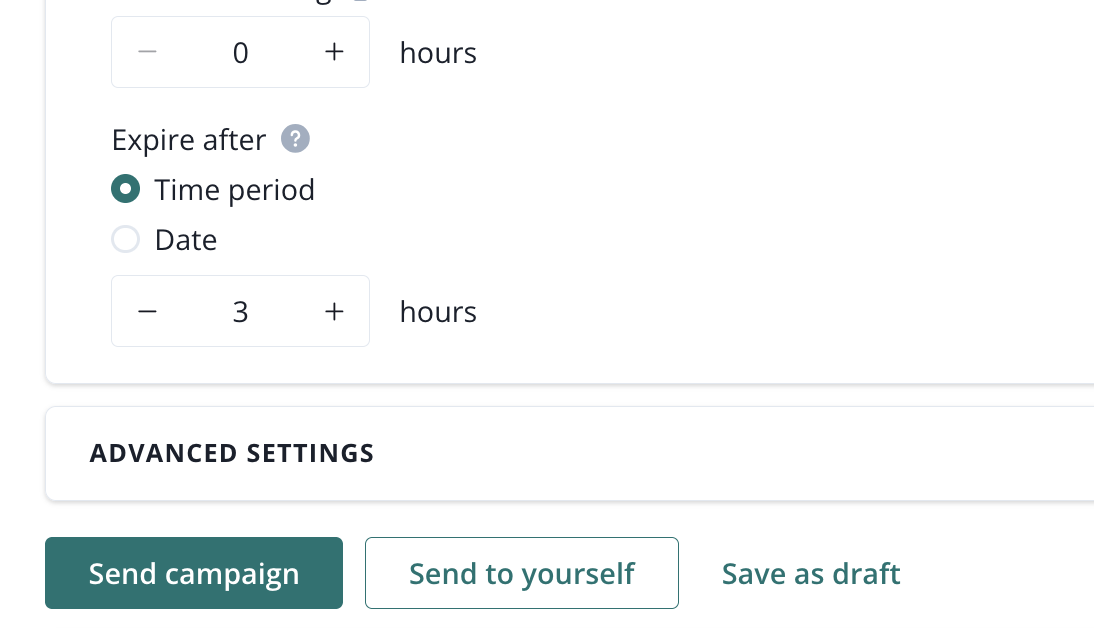
When you choose 'Schedule campaign' you can pick the time of the campaign's dispatch as well as the expiration time.

The campaign's expire date is particularly important when sending notifications regarding information that may be time-sensitive, like limited promotions or news. The expire date can be set between 1 hour and a maximum of 72 hours.
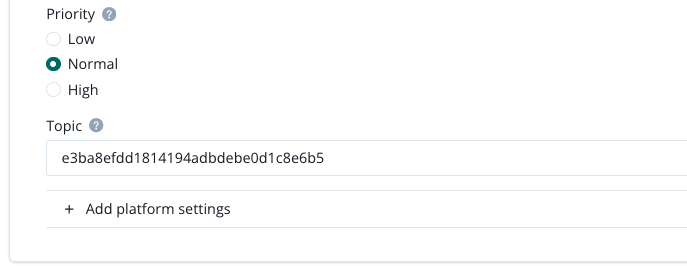
Push advanced settings (priority)
This section contains options related to providers (web and mobile apps, divided into Android, Huawei, and iOS). Shared options are applied to all push notifications unless overridden by more specific ones (e.g., web-specific).
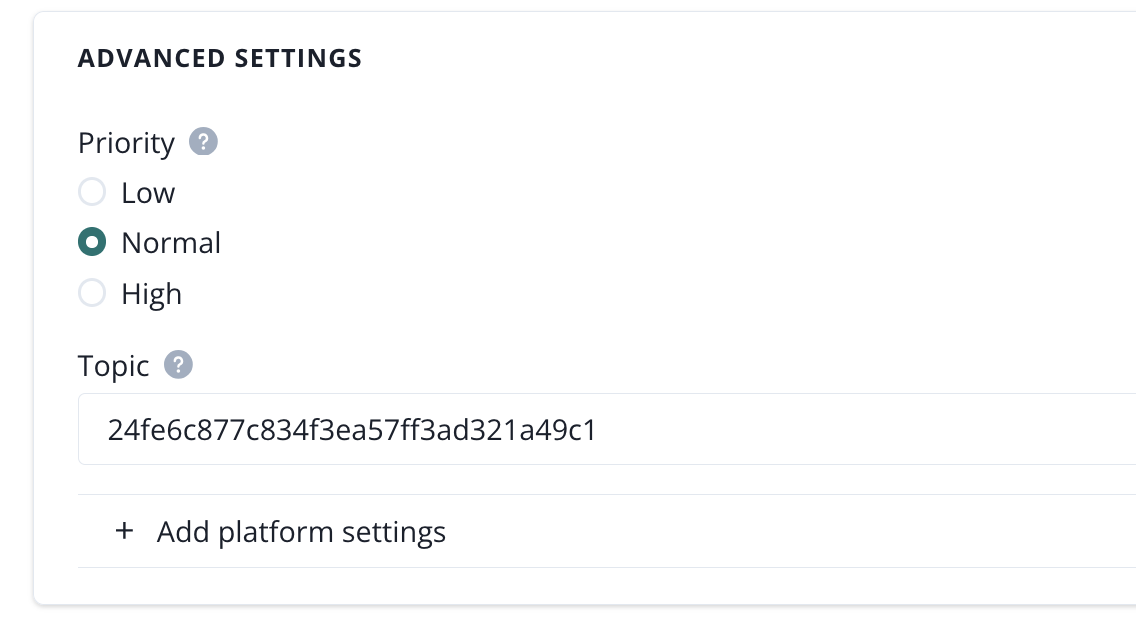
The available options include:
- Priority (push priority): A parameter defining the priority of the push notification. Higher priority ensures faster delivery of the message but may increase battery usage on the user’s device.
We do not recommend using the high priority settings for all your campaigns. If this setting is overused, the provider (Vapid, iOS, Android, etc.) might start treating your project as spamming and ban you from using high priority. If that happens, your campaigns will have a default, normal priority.
- Topic (push topic): A parameter used for grouping notifications. By assigning a notification to a specific topic, notifications within the same topic will overwrite each other. This ensures the user receives all notifications but only the most recent one is displayed.
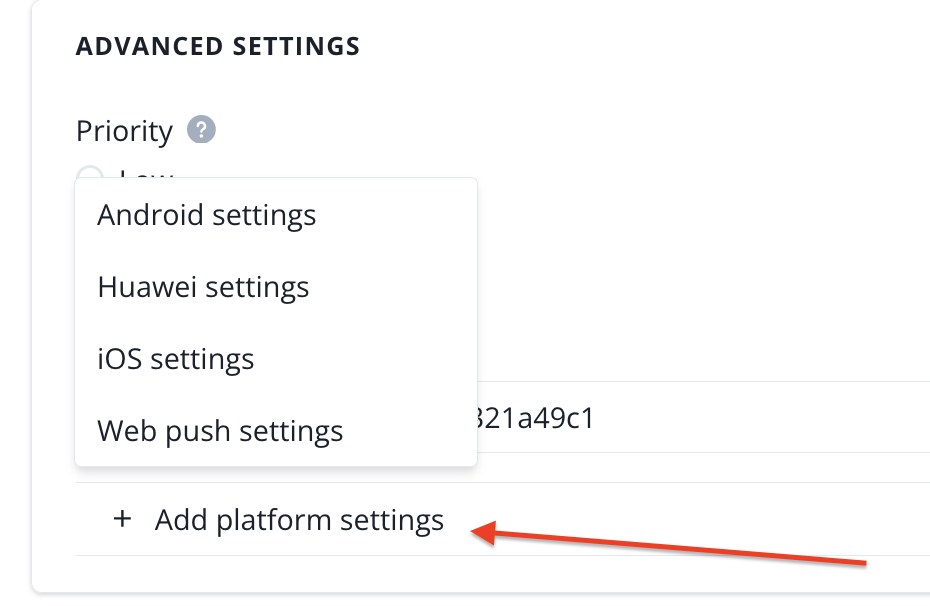
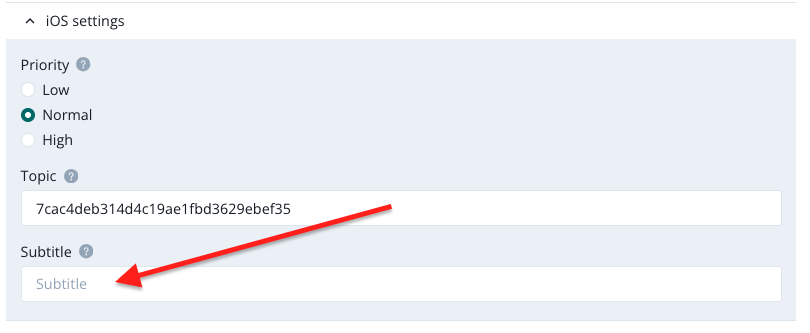
- Specific platform settings
- iOS Subtitle: A parameter available exclusively for iOS, allowing you to add a subtitle to the notification. It is displayed below the main title of the notification and enables the delivery of an additional, concise message that complements the main content.
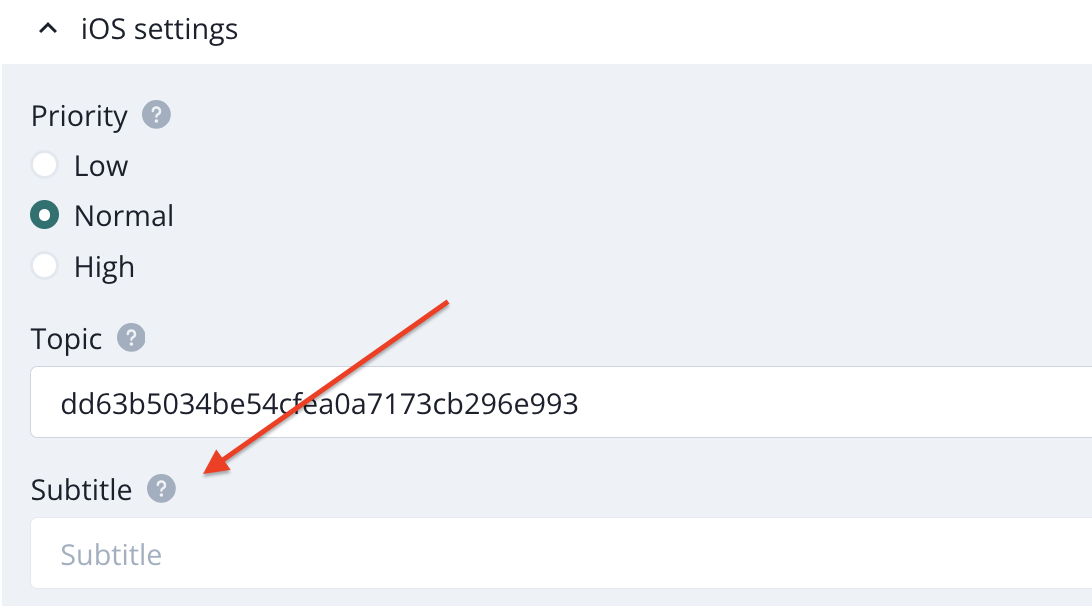
Use case: You are broadcasting a football match score via push notifications. You can overwrite the previous push with the latest score, ensuring that, for example, users who didn’t read earlier messages will only receive the most recent one.
Send push campaign
Once you are done with the configuration, you can hit Send campaign, save it as a draft or test it by hitting Send to yourself.
For Send to yourself option to work, you must be first signed up for notifications in PushPushGo.
Push campaign drafts
These are saved under Drafts in the upper right corner of the push creator.
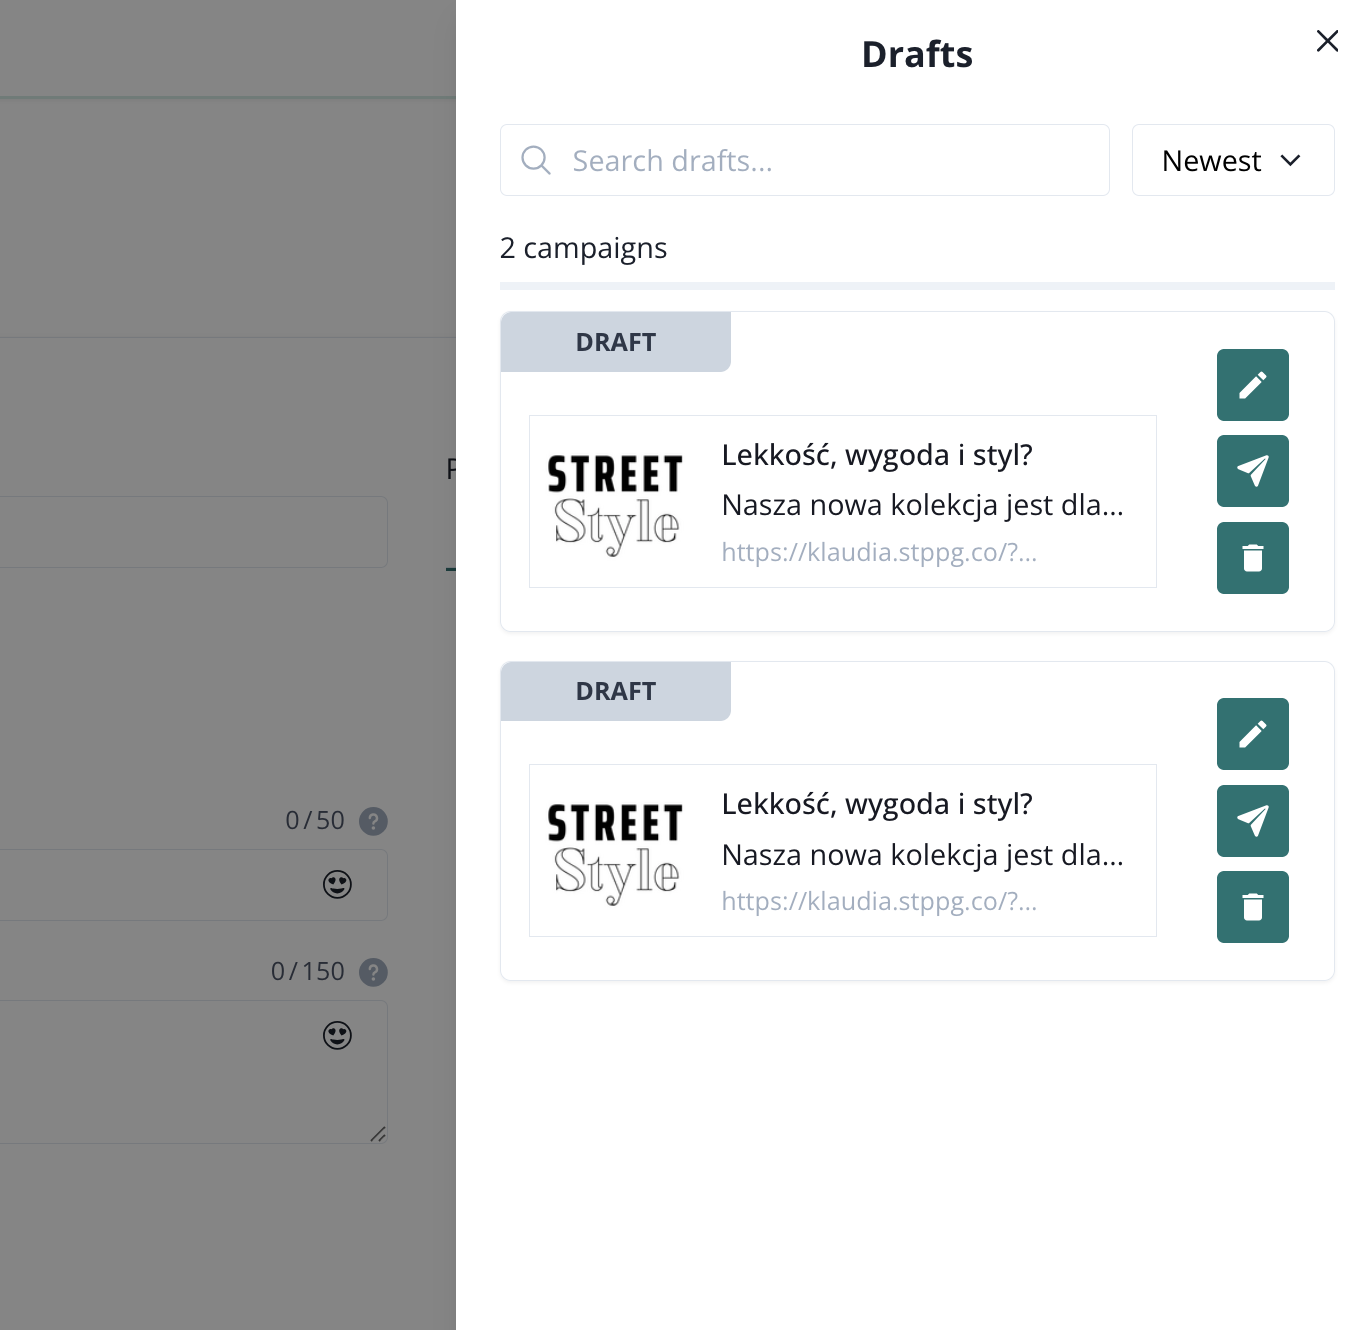
Each draft has three actions:
- edit,
- copy and send,
- delete.
Push campaigns' list
The Campaign List presents currently planned or previously sent push campaigns and allows you to perform certain actions: delete, create a new campaign on the basis of one previously prepared, view or cancel sending.
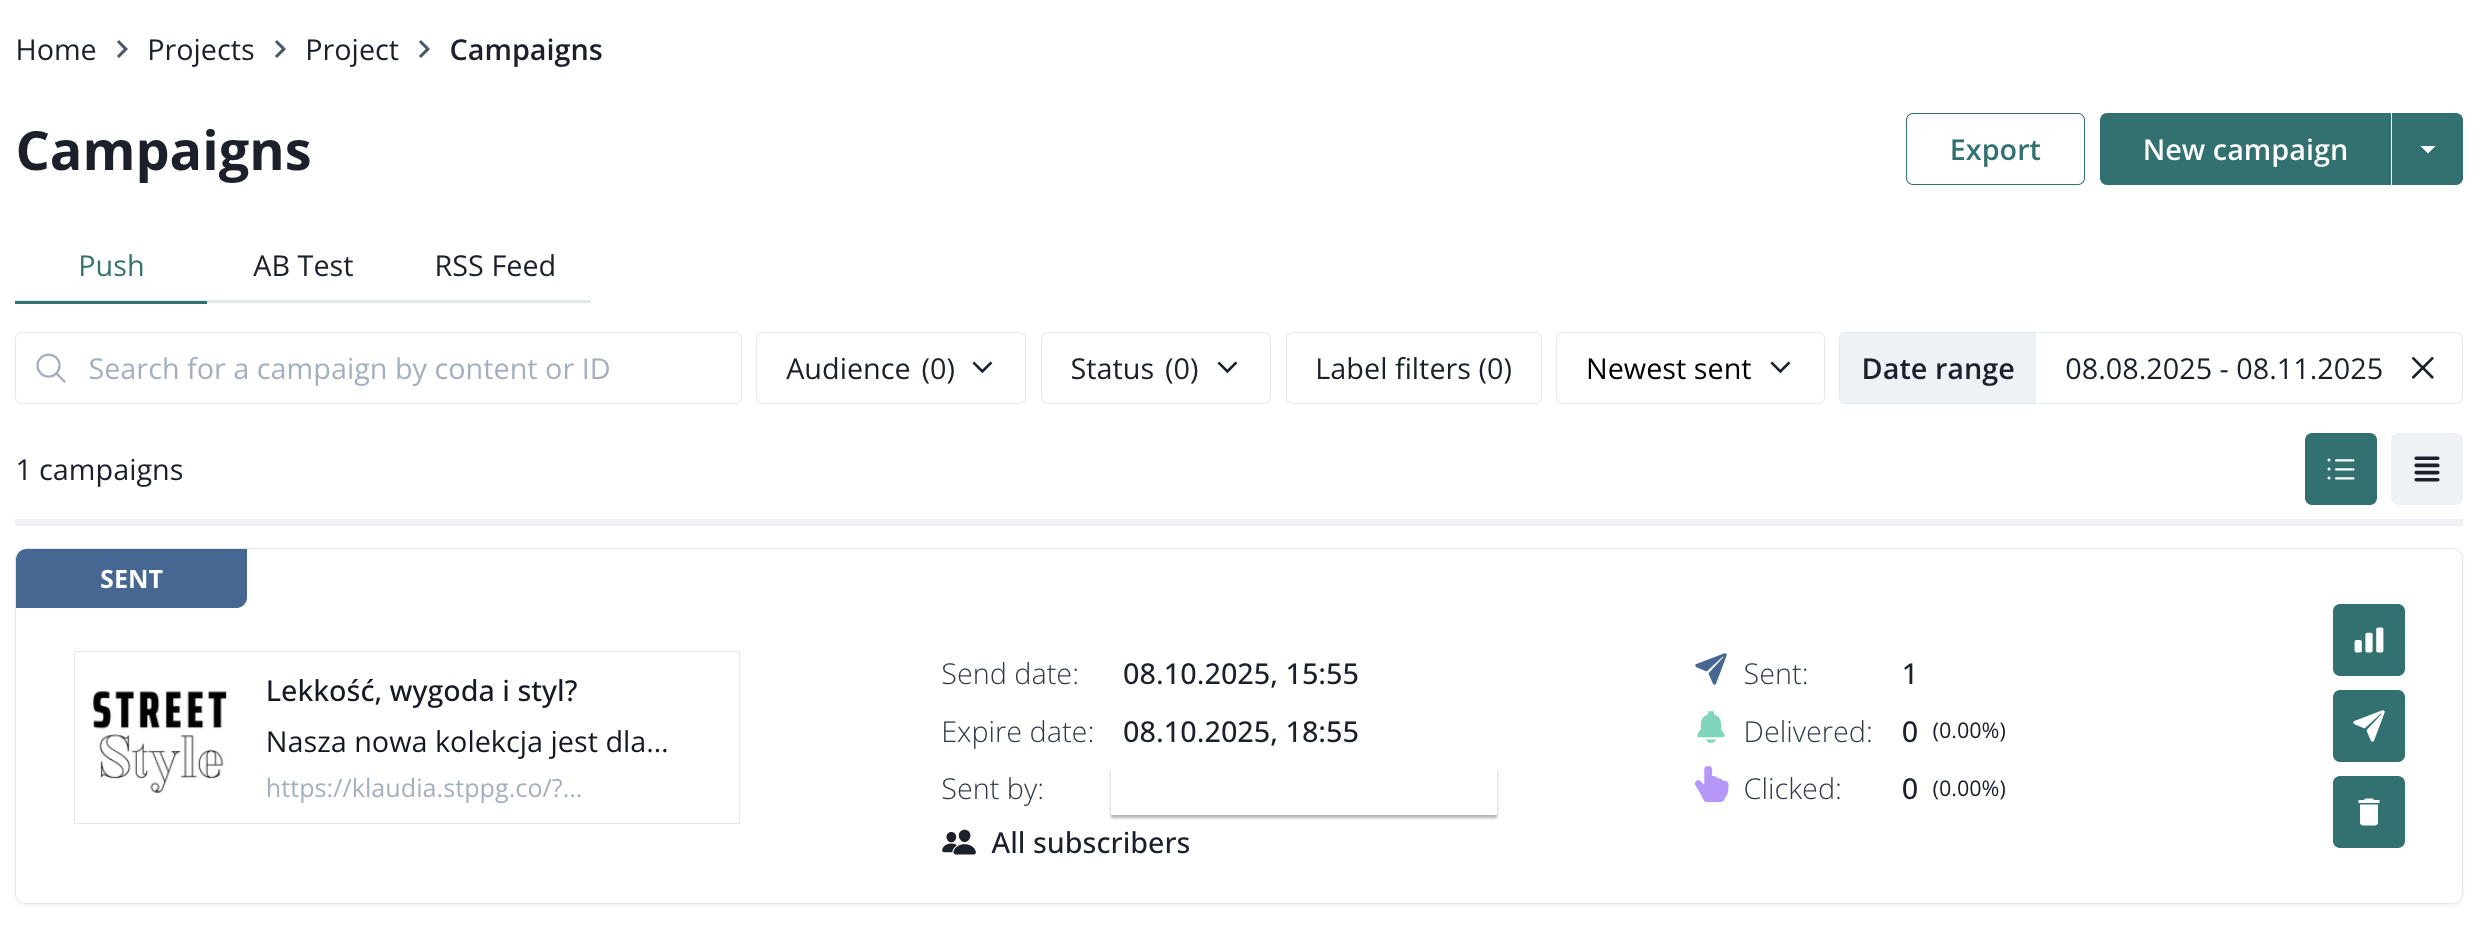
This view allows you to search campaigns and sort them for example by status or audience.
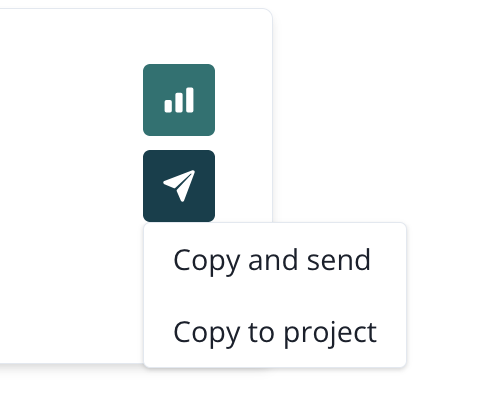
Every campaign has the following action buttons:
- campaign report,
- copy campaign,
- copy and send,
- copy to another project,
- delete.
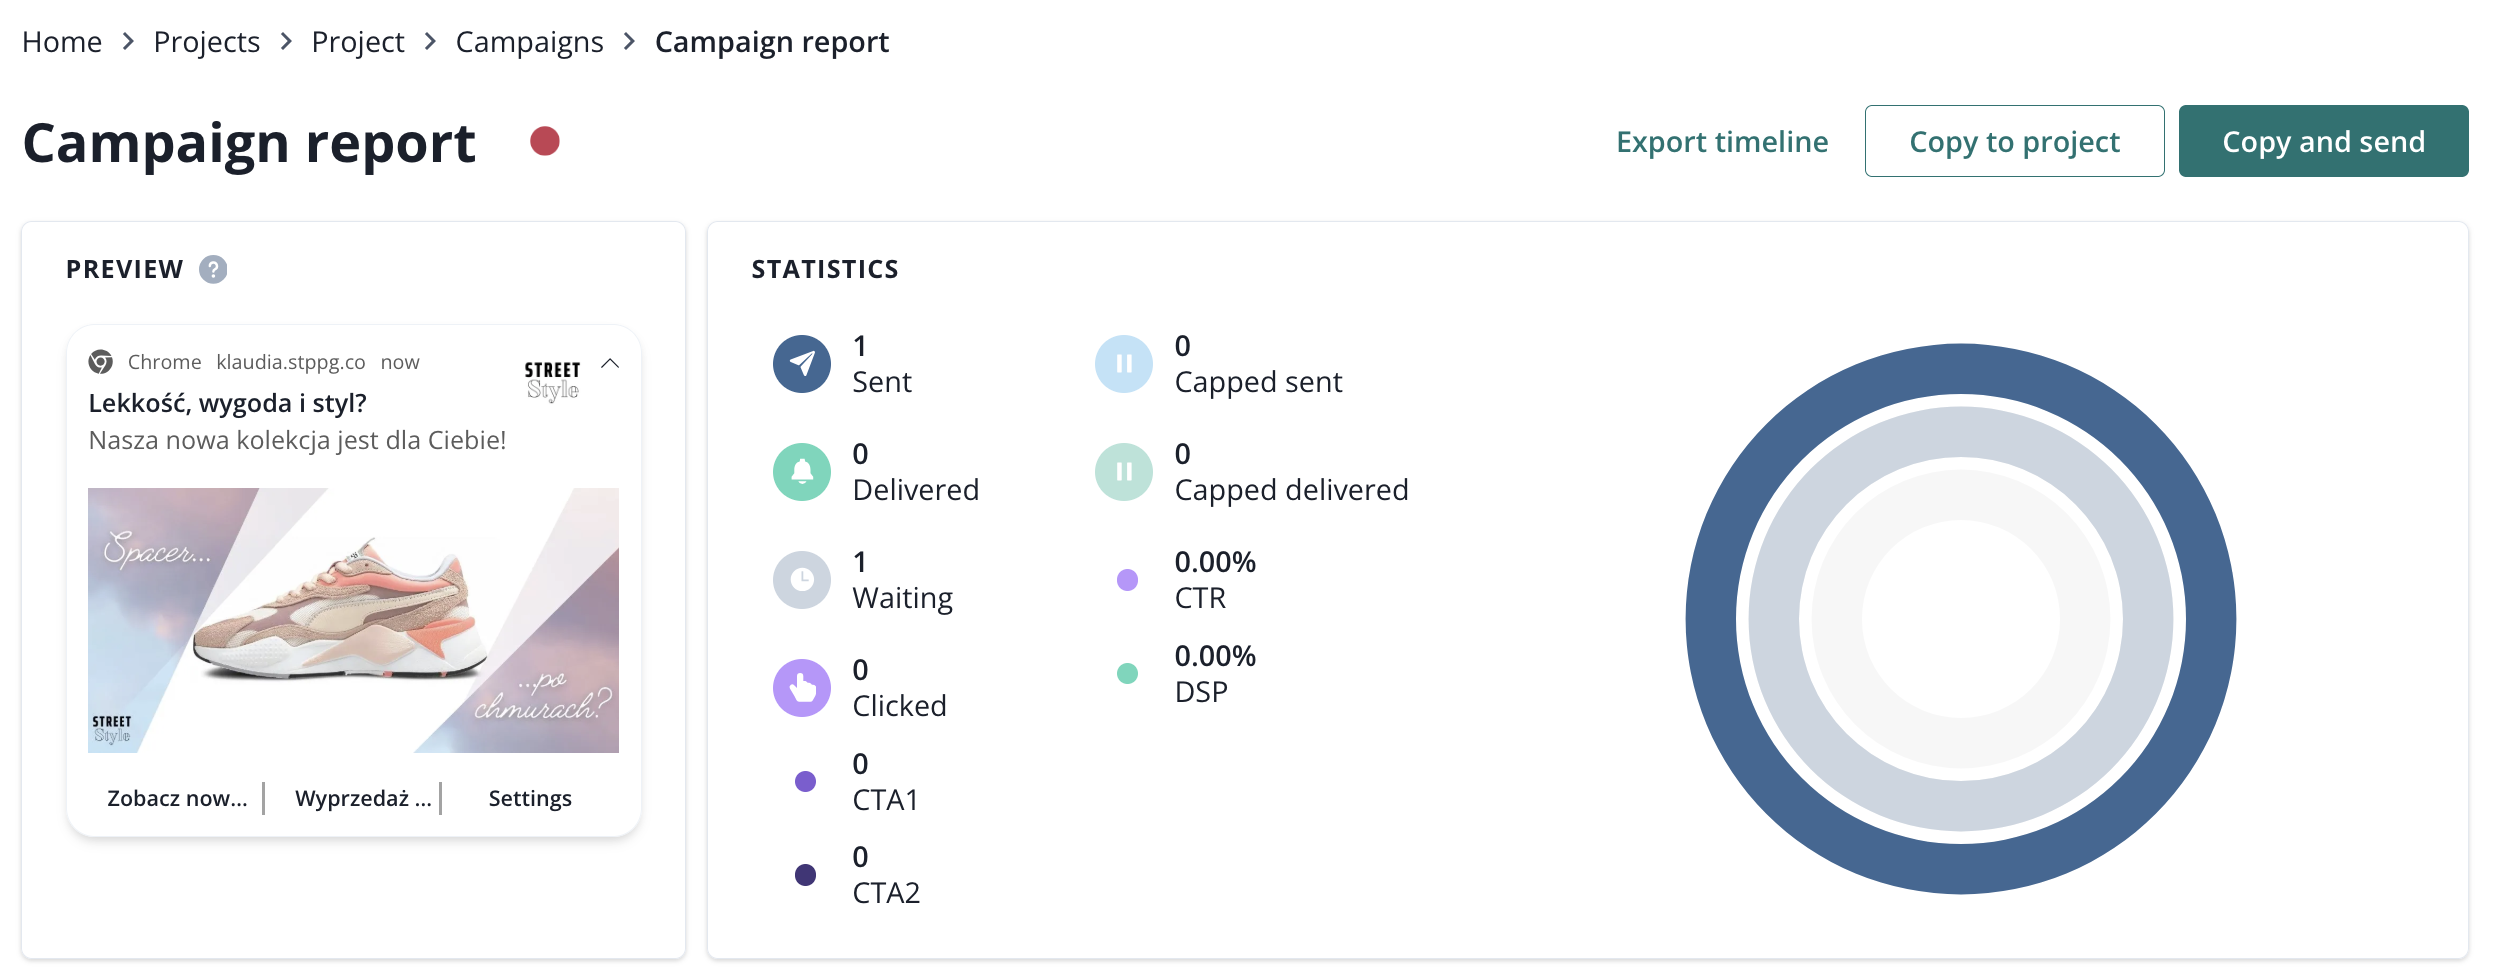
Push campaign report
Campaign report consist of:
- preview,
- statistics,
- details,
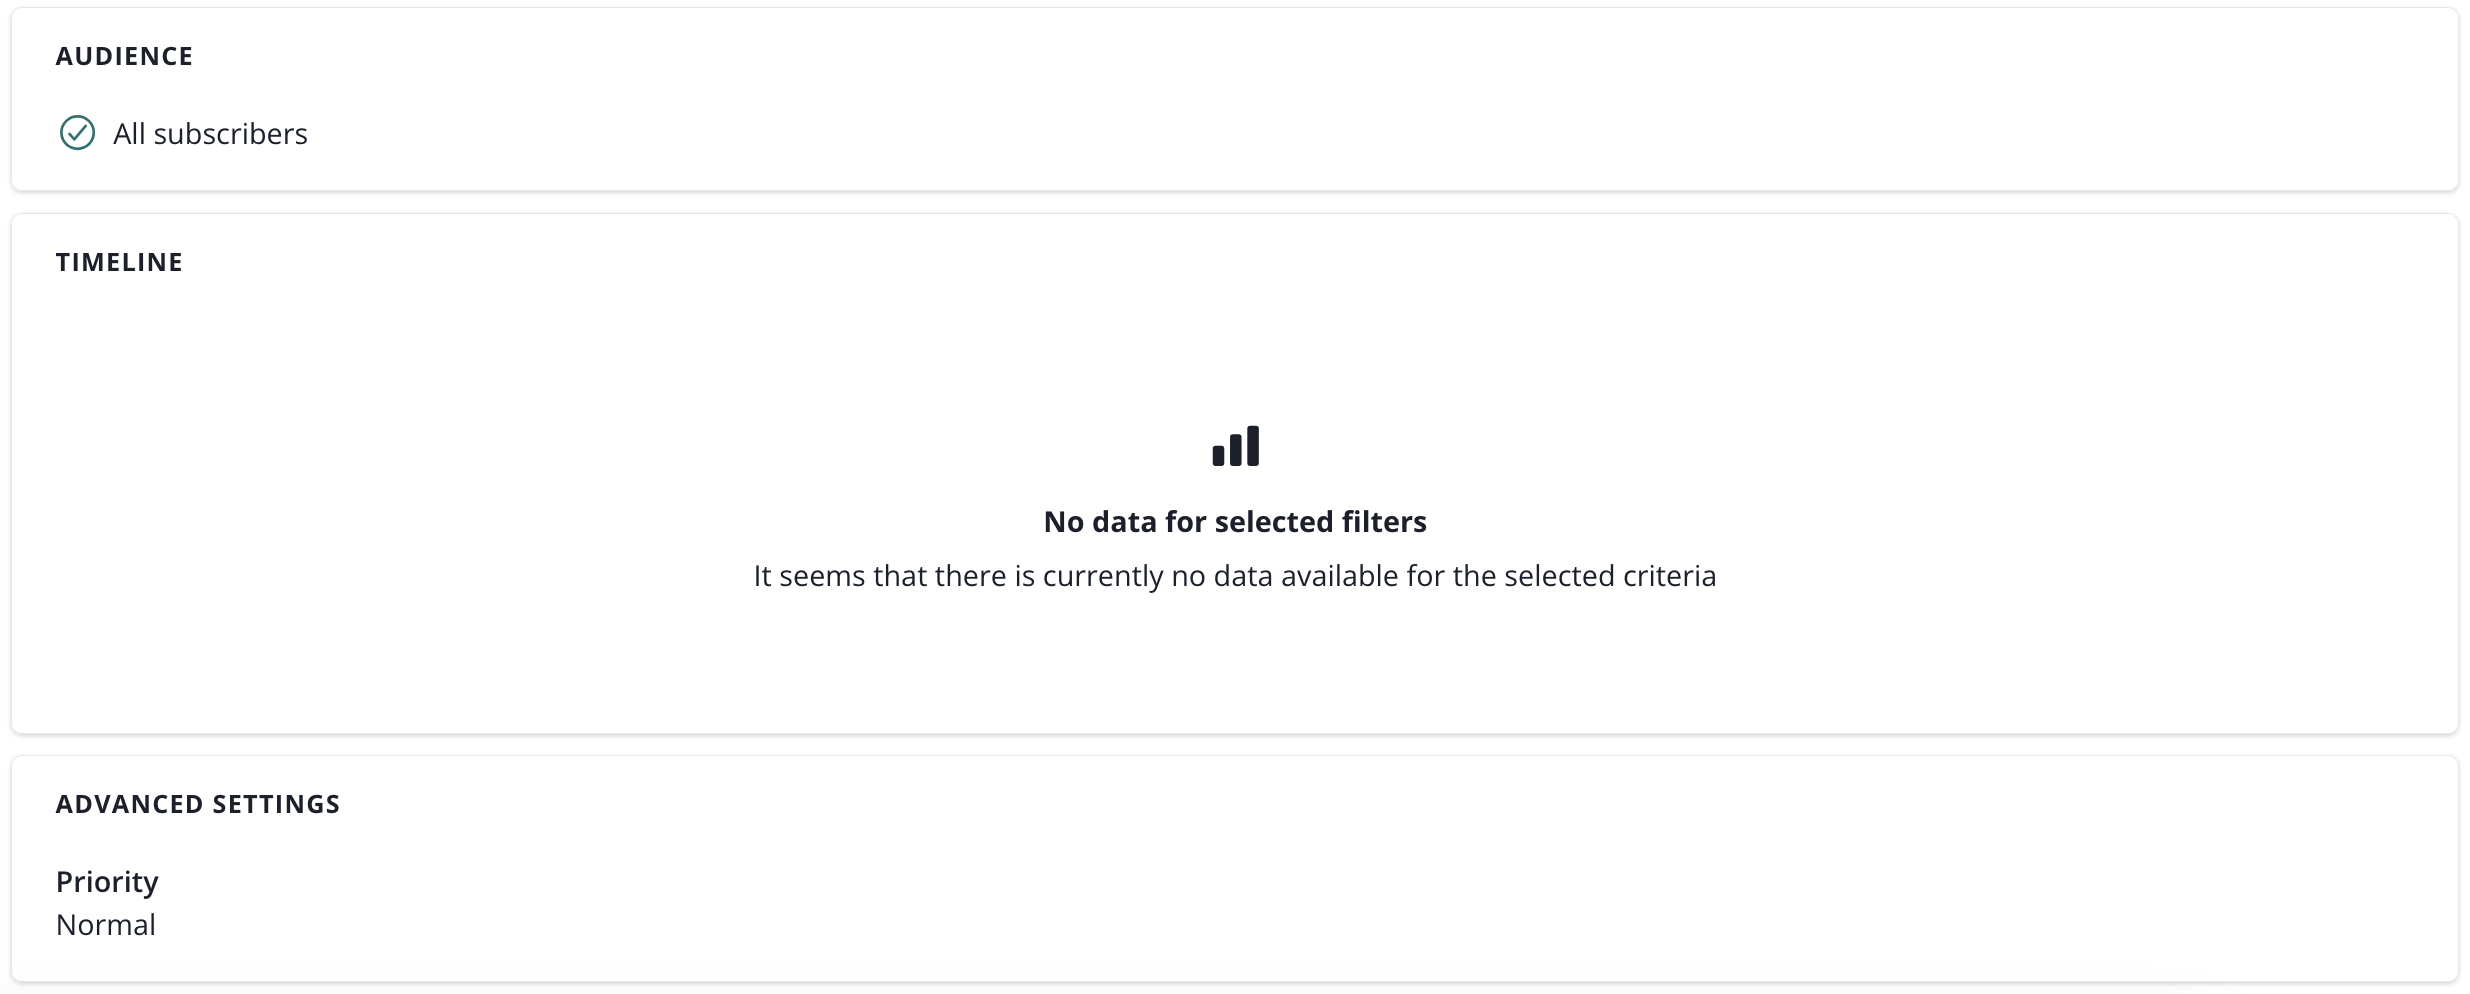
- audience,
- timeline (events like delivered and clicked on a timeline),
- advanced settings (priority).
AB test push campaign
Overview
AB test allows you to test push notifications on a chosen sample of a selected group of subscribers (web push or mobile push).
Test push variants are sent to a selected pool of your subscribers to determine which version achieves better CTR results. The winner variant is then sent to the rest of the selected group of subscribers. You can choose the winner manually or set an automatic selection.
By conducting an AB test you can verify which content, title, image, or any other setting performs better and gives you a higher CTR result. A test requires at least 2 and up to 10 push variants (further referred to as variants).
Create AB test
To create and send a new AB test, click on the arrow next to the "New campaign" button and select the "AB test" option from the list.

Once you are in the AB test creator, you will need to complete the below steps to setup your AB test.
- Configure variants (minumum two)
- Select audience
- Choose time
- Plan AB test
AB test variants
While working on your test, you can save it as a draft and come back to it later. However, you need to have a minimum of 2 and up to 10 variants in your test to proceed.
At the top of the Variants step you will see tabs, with one tab for each variant. To add a new variant, click on the ‘Add variant’ button on the right of the variants tabs.
Above each variant, there is a trash icon. The trash button deletes a variant.

The variant's anatomy is the same as in the push creator. For a valid variant you need to provide:
- title,
- message,
- link.
Other settings you can add or modify are:
- icon (if none is provided, we will use your project logo or, if you haven't uploaded any, the green image with the bell icon),
- image (big image visible in some browsers),
- require interaction option (for Chrome browsers only: variant will be displayed until user clicks on it),
- variant action buttons (up to 2 buttons).
Images for both icon and image can be uploaded from your device or you can choose some from your "Recently uploaded".
You can check how the current variant looks like in a notification’s preview located in a column on the right-hand side of the page.
If you have set up some default settings (the gear icon on the right side), such as:
- UTM parameters,
- action buttons,
- expire date,
- require interaction.
they will be automatically applied to your variants, but you can modify them as you like.

AB test audience
In this step, you can choose the group of subscribers to whom the AB test will be sent to. The audience can be selected by segments or labels.

In this step, you also need to select the percentage of the audience that will participate in the test. The selected sample has to be at least 1% and up to 50% of the targeted group. You need to have at least one subscriber for each variant to make the test work. To choose the percentage of the tested group, type a value in the input or set a value with a slider.
How does the division of subscribers between variants work?
Example: You have 100 subscribers, and you decide to have 2 variants in the AB test.
If you choose a 20% split part, it means that from all of your 100 subscribers, 20% will receive test variants: which equals 20 subscribers.
These 20 subscribers will be split into two groups, one for each of the 2 variants, so each variant will be sent to 10 subscribers.
To sum up, for the given scenario the first variant would be sent to 10 subscribers, the second variant to 10 subscribers, and the winner to the remaining 80 subscribers.
AB test priority
Options related to providers (web and mobile apps, divided into Android, Huawei, and iOS). Shared options are applied to all push notifications unless overridden by more specific ones (e.g., web-specific).
The available options include:
Priority (push priority): A parameter defining the priority of the push notification. Higher priority ensures faster delivery of the message but may increase battery usage on the user’s device.
Topic (push topic): A parameter used for grouping notifications. By assigning a notification to a specific topic, notifications within the same topic will overwrite each other. This ensures the user receives all notifications but only the most recent one is displayed.
iOS Subtitle: A parameter available exclusively for iOS, allowing you to add a subtitle to the notification. It is displayed below the main title of the notification and enables the delivery of an additional, concise message that complements the main content.
Use case: You are reporting a match score via push notifications. You can overwrite the previous push with the latest score, ensuring that, for example, users who didn’t read earlier messages will only receive the most recent one.
AB test time
There are two ways to send your test:
- send now,
- schedule AB test.
By choosing the ‘Send now’ option, your test will get a set of already configured settings :
- AB test will start instantly,
- last 15 minutes,
- the winner will be chosen automatically based on CTR (in case of equal CTRs, the variant with higher Clicked value will be selected, and for equal Clicked values, the winner will be sent randomly),
- and the winner's expiration date will be set according to your Default setting Expire Date (the gear icon on the right side) or default 72 hours.

If you want to modify the time settings by yourself, switch to ‘Schedule campaign’.
In the ‘Schedule campaign’ you need to set:
- test start date,
- test end date (in a range from 15 minutes to 72 hours from the test start date),
- winner selection type.
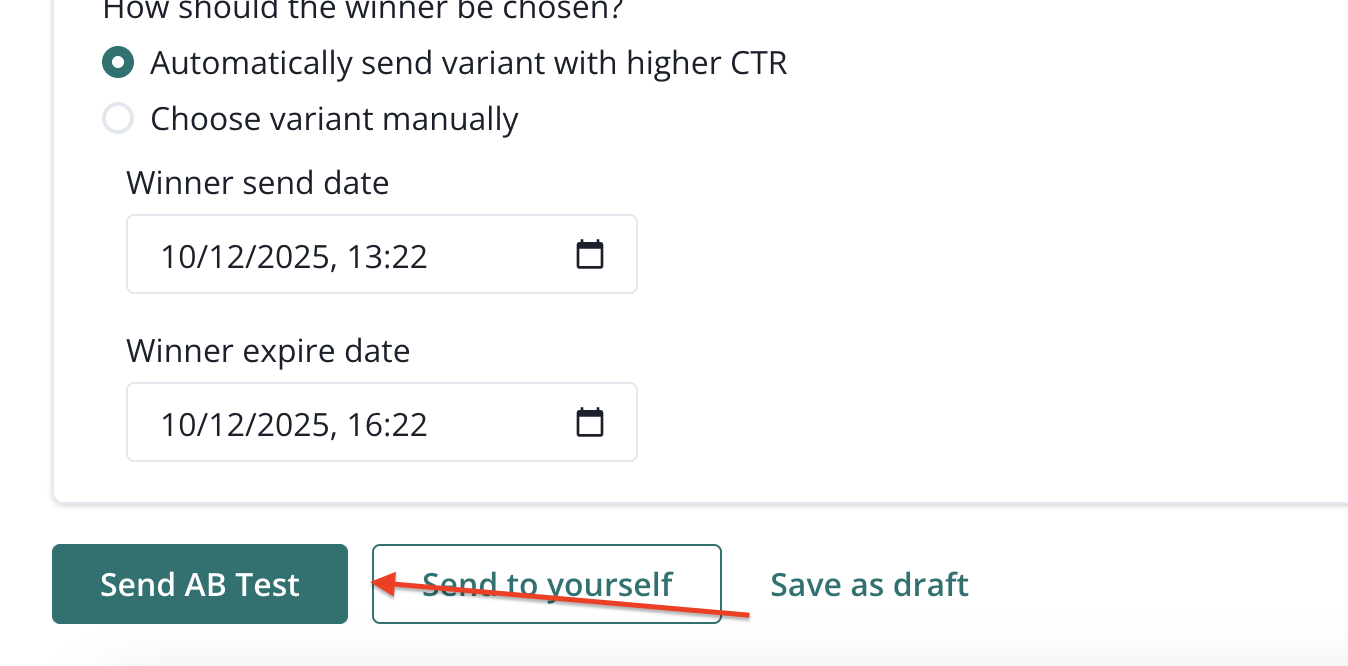
For winner selection type, you can choose between:
- automatically sending a variant with a higher CTR result,
- choose variant manually.
If you want us to choose the winner automatically, you’ll also need to provide:
- winner send date (up to 72 hours from the test end date),
- winner expire date (in a range from 1 to 72 hours from winner send date).

AB test send campaign
Once your test is created, you can save it as a draft, send to yourself or proceed with it by clicking the ‘Send campaign’ button.
If you want to proceed with the AB test and send it, we will prepare the subscribers group for your variants and a winner.
In this step, we randomly split subscribers from the group chosen earlier - equal chunks for variants and the rest for the winner. Then we allocate them in a partition where they will be waiting for the test start date.
Now you can relax and wait for the AB test results 🎉
If your subscribers sample is too low, we won't be able to prepare the test partition, and your test will be marked as failed. Remember that the sample requires a minimum of 1 subscriber for each variant in the AB test.
AB test drafts
AB test drafts can be found under Drafts button in the upper right corner of the creator.

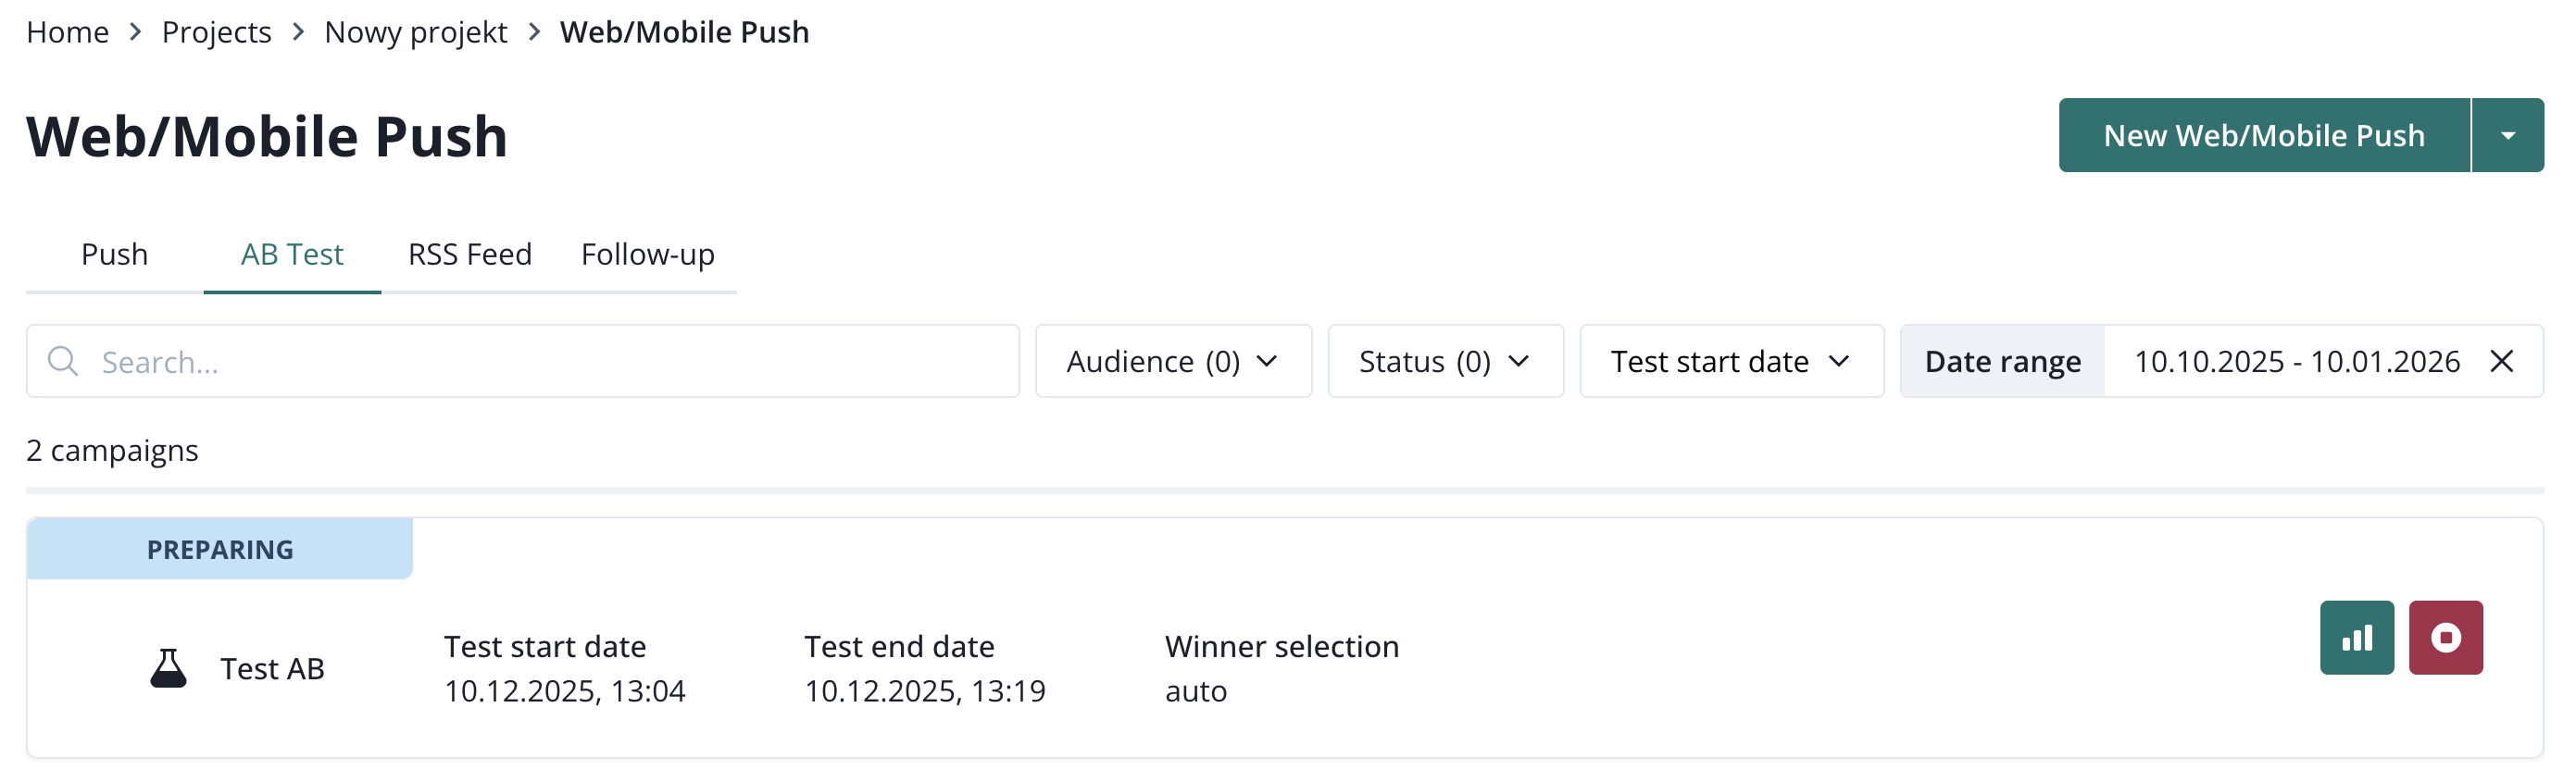
AB test list
Click “Campaigns” on the menu, then switch the select button to “AB” in the upper-left corner. (left-side navigation > Campaigns > AB).
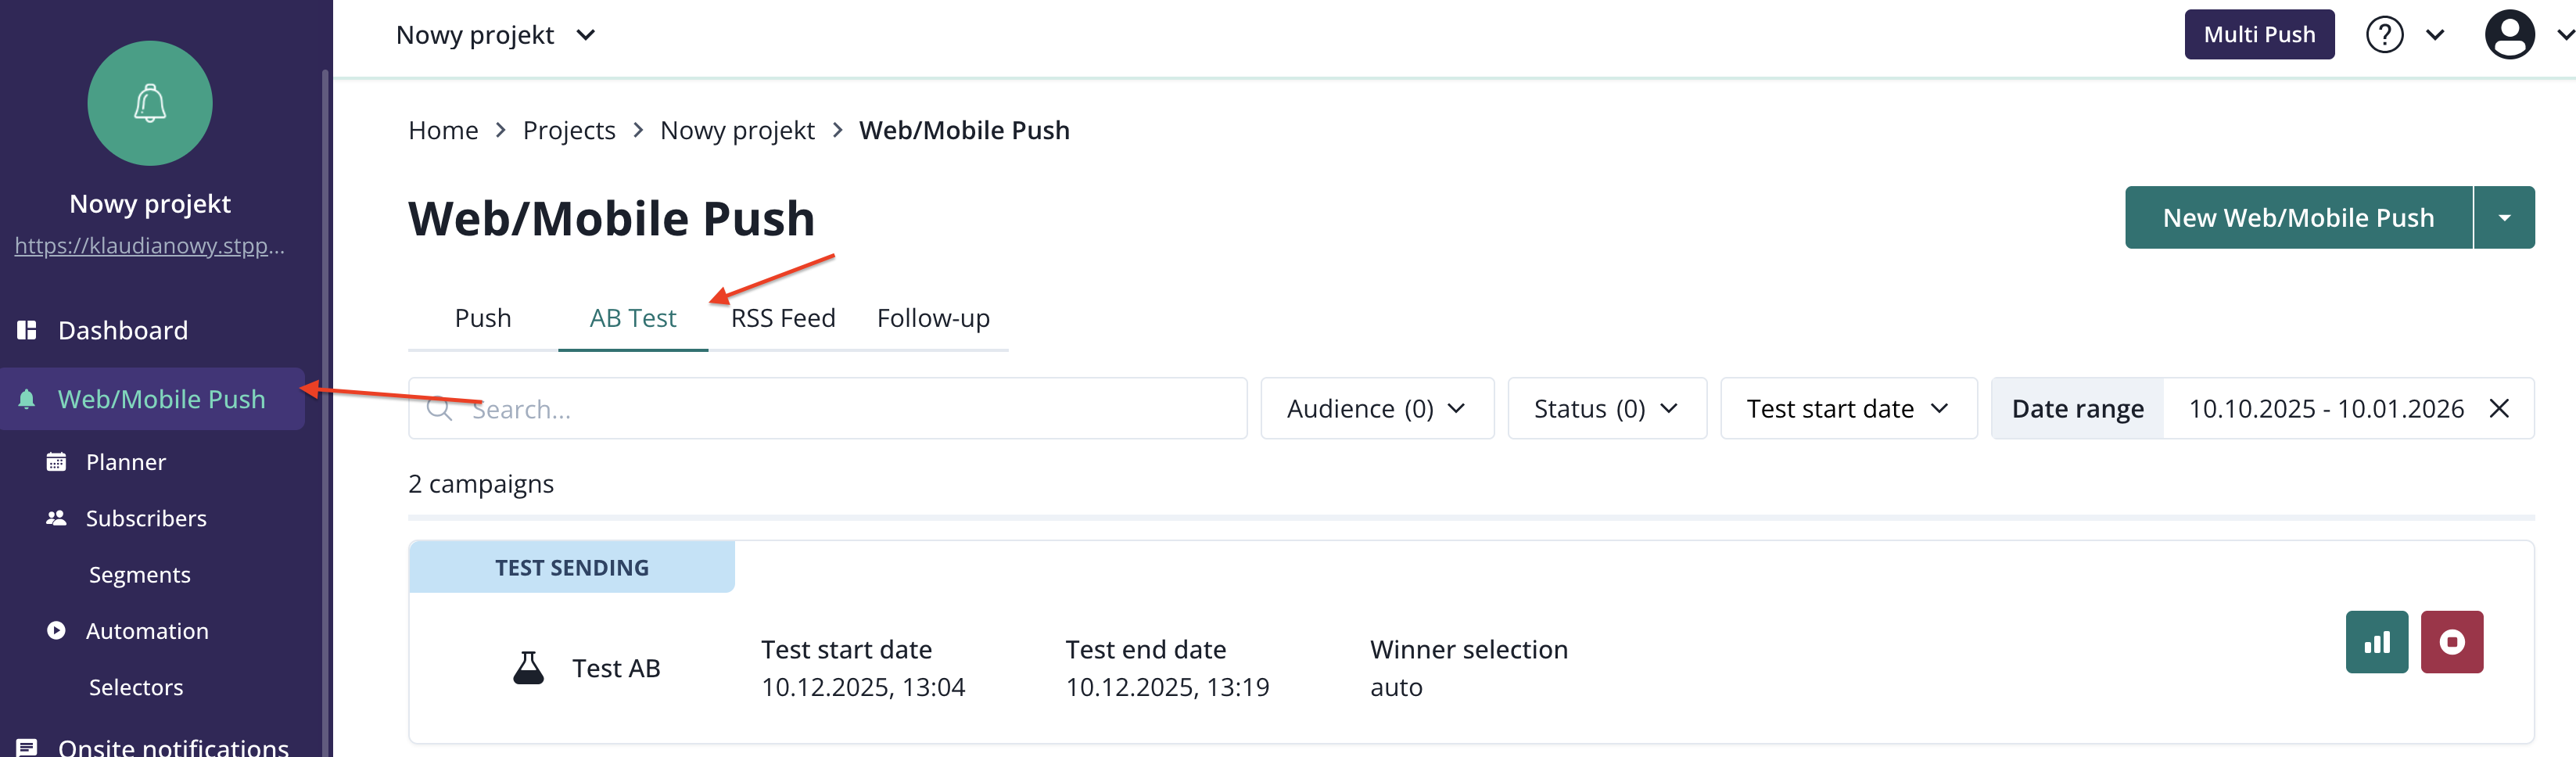
There, you have a list of all your AB tests.
To find the particular AB test, type its name in the search box.
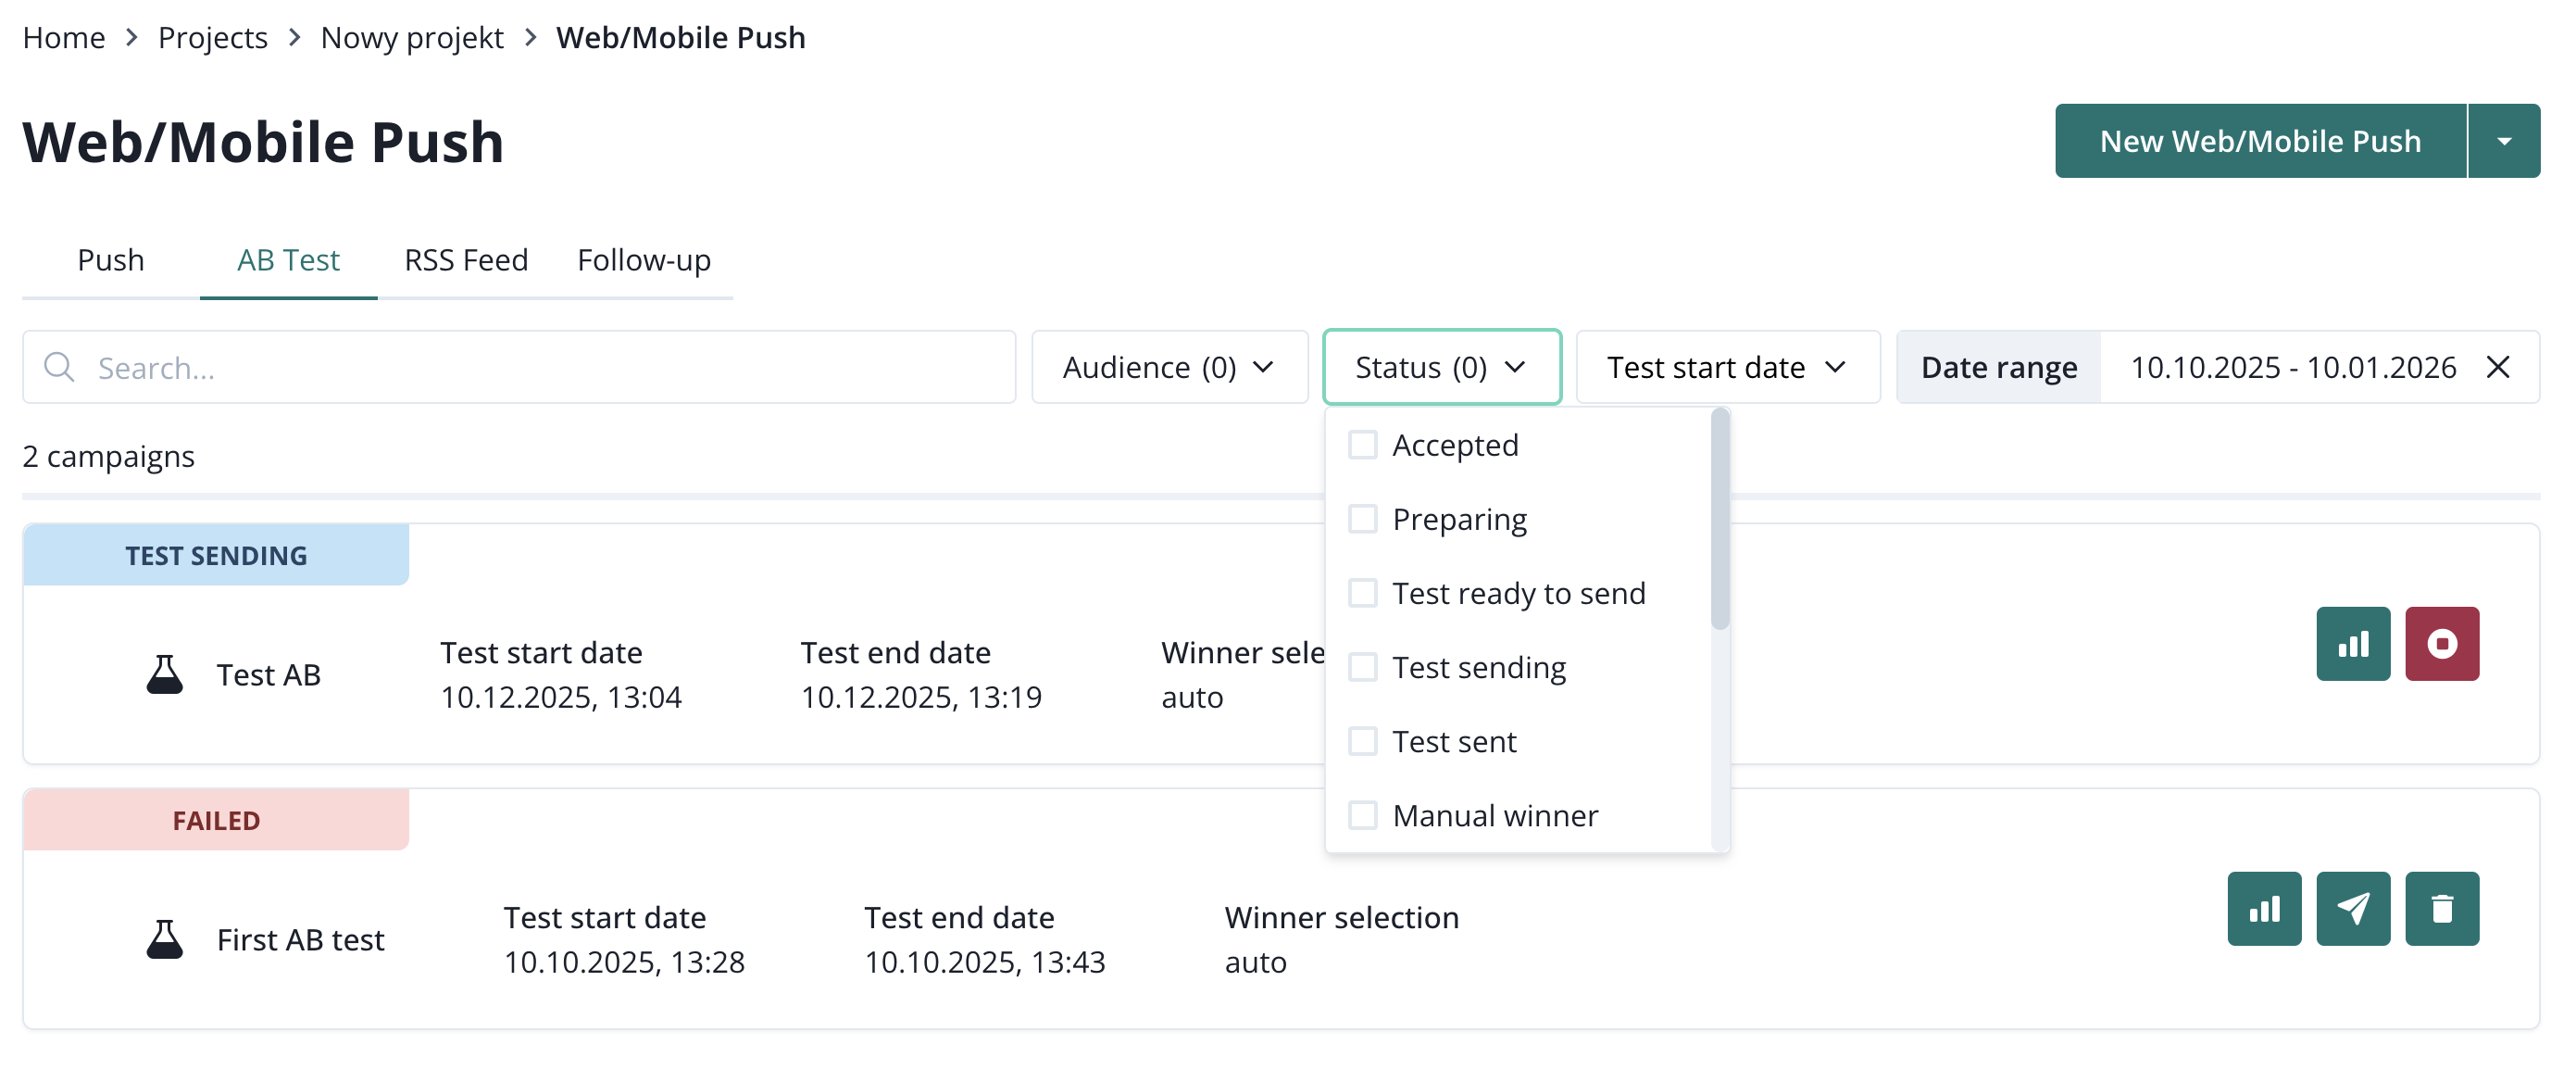
To see only the tests with a specific state, use the select menu in the upper right corner of the list.
For example, if you want to see the tests in which manually choosing a winner is required, select “Winner ready to send”.
Also, you can sort your AB tests by the date of their creation, sending and ending.
AB test report
To consult an AB test report and details, you should go to the AB test list view (left-side navigation > Campaigns > AB test), and select the test you’re interested in by clicking on the report button:
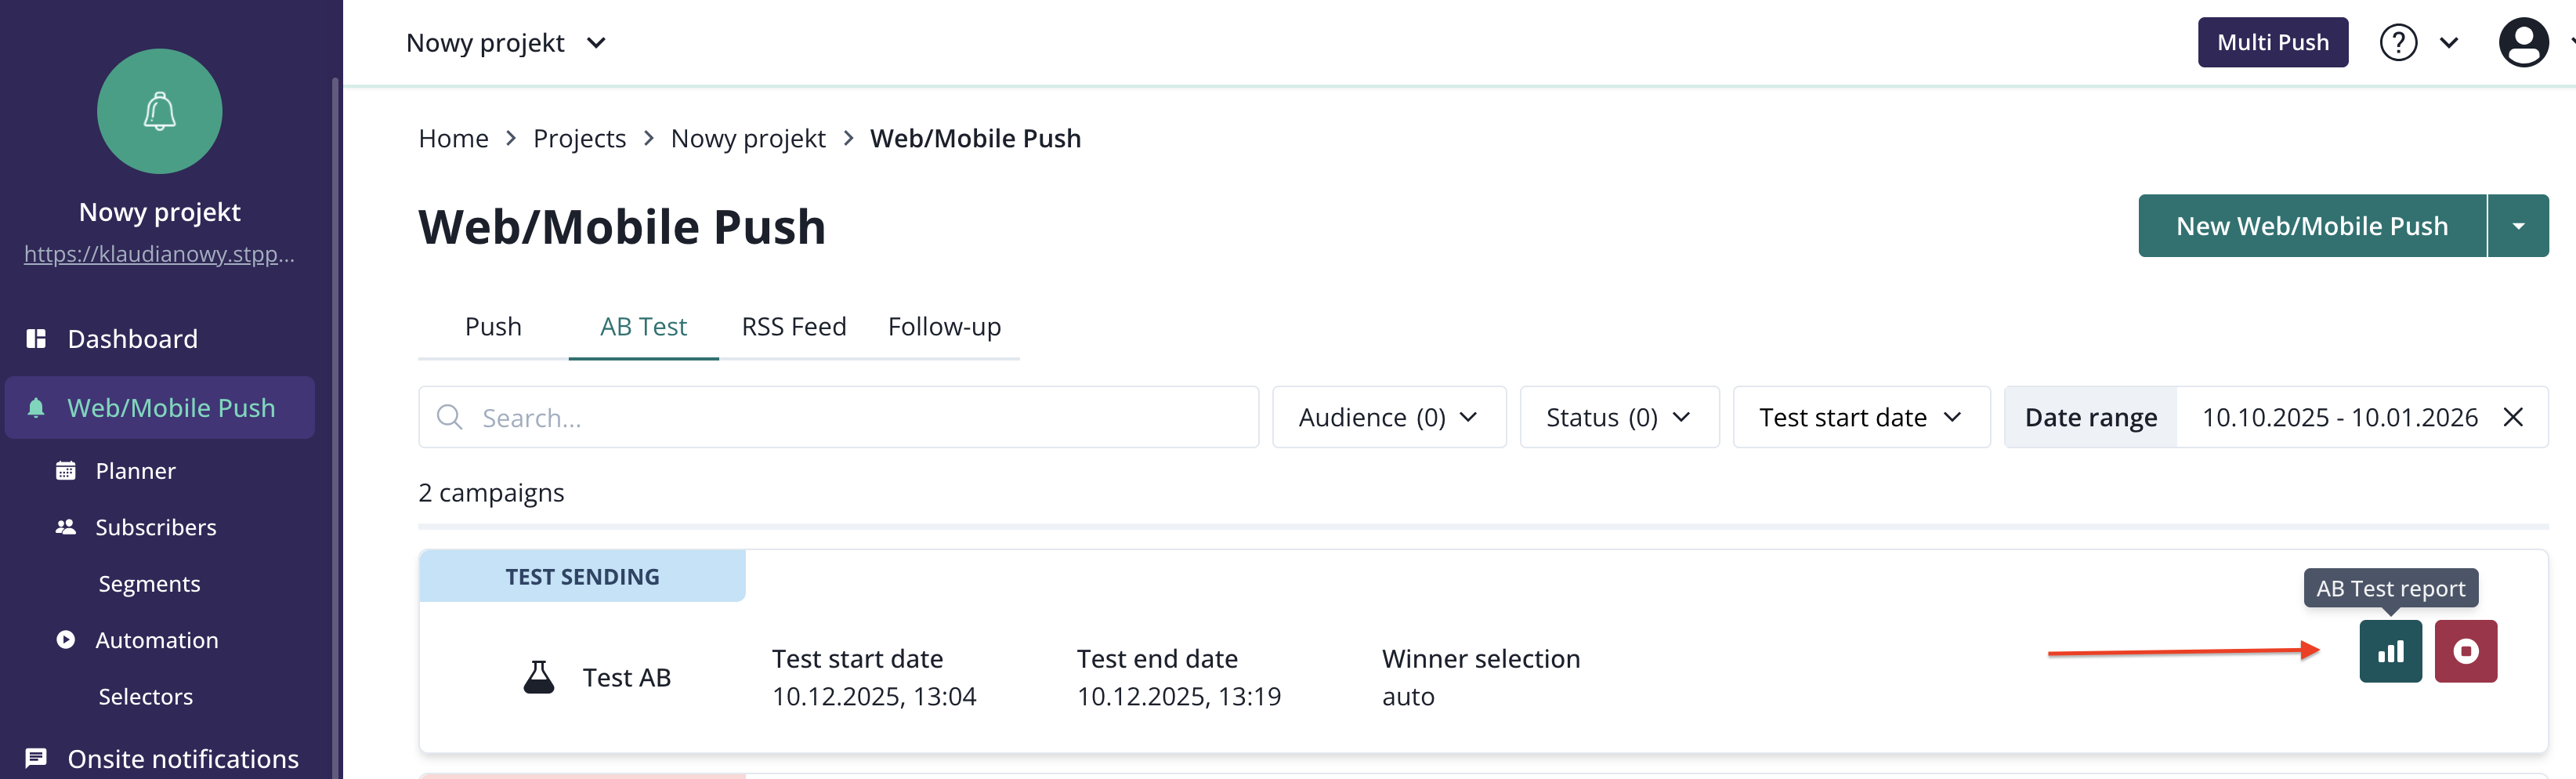
On the report page, you can see your test details and settings. If the test has a winner selected, we can see the winner’s details. If the test's winner had already been sent and its expire date has passed, you will be able to see its results.

After the test end date you can verify the variants’ results (sent, delivered, clicked, CTR, and DSP (delivered divided by sent). If there’s no data collected (ex. if the test has failed at some point), you’ll see an empty table and data.


Cancel AB Test
From the moment your AB Test has been accepted, you can cancel it. All you need to do is click the “Stop AB test” button located right next to the chosen test on the AB Test List.

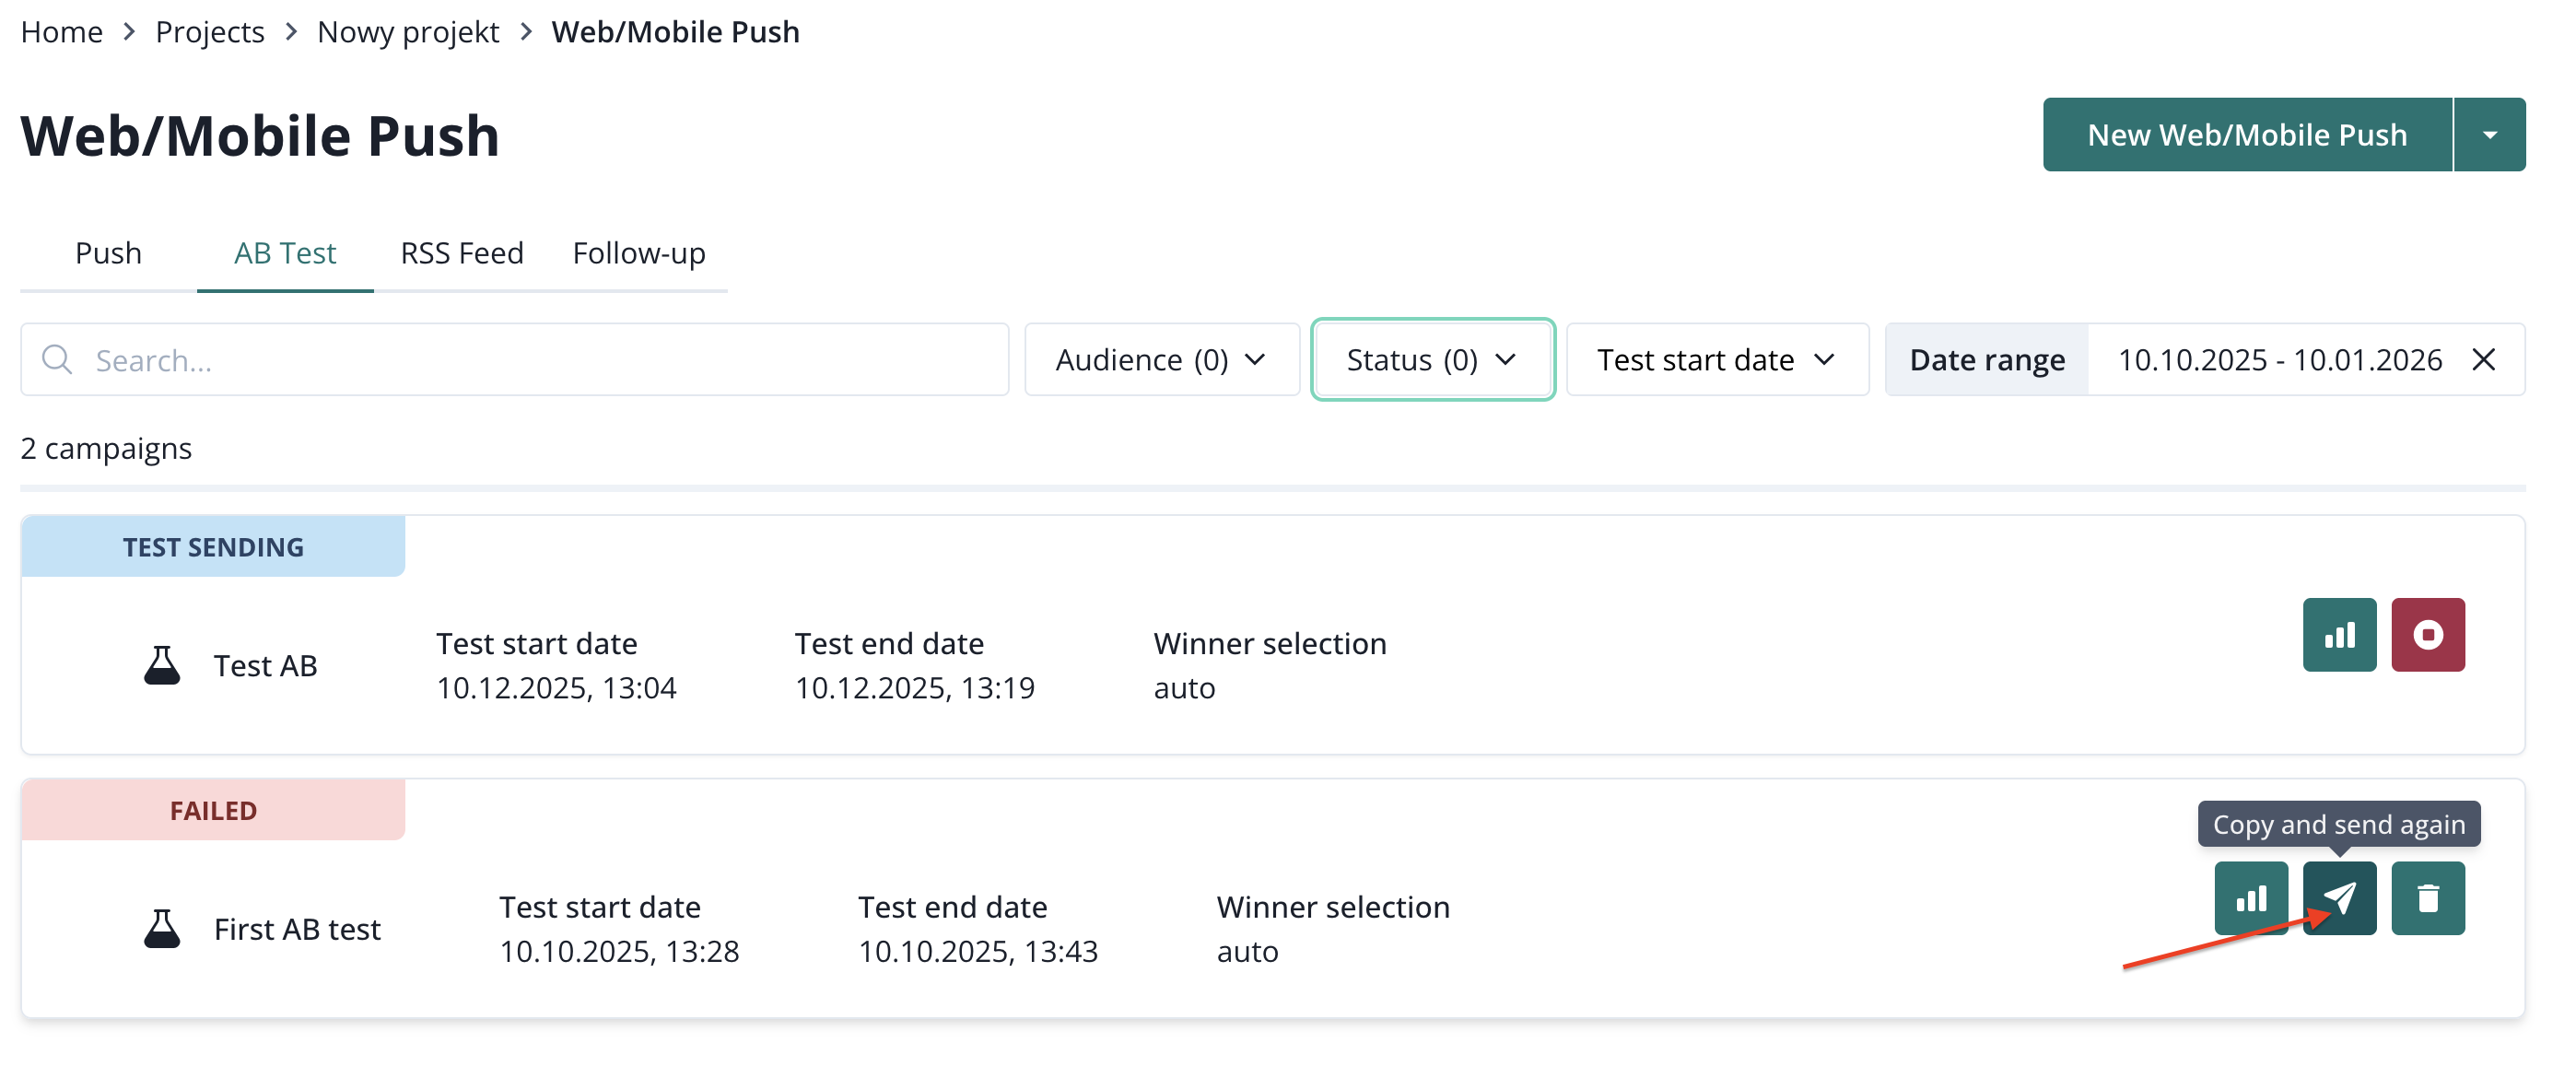
Resend AB test
If you want to edit the existing AB test or resend one of your previous tests, go to the AB test campaigns list (left-side navigation > Campaigns > AB test) and click the 'Push' button. You'll be redirected to the AB test creator, which will be filled with settings from the AB test you wanted to resend.
Follow-up campaign
Overview
A Follow-up campaign is a type of push campaign available in PushPushGo. It enhances communication with users by allowing you to send a series of notifications or increase the reach of a specific message.
Each Follow-up campaign consists of a source campaign and one or more follow-ups that are sent after the source campaign.
You can use a follow-up strategy in two main ways:
- Create a sequence of notifications to maintain ongoing user engagement.
- Increase the reach of a campaign by sending follow-ups to subscribers who did not receive the original message — for example, due to technical issues or temporary unavailability at the time of the initial send.
This feature helps ensure broader message delivery and supports multi-step communication strategies for more effective user engagement.
Create a source campaign
You can create a Follow-up campaign directly from the Dashboard by selecting Follow-up campaign from the drop-down menu.

Once selected, you’ll be taken to the follow-up creator.
1. Name your campaign

2. Complete the campaign setup
Because a follow-up is a type of web push campaign, the creator works exactly like the Web Push Creator you already know.
Fill in all the required sections:
- Message – Define the content of your notification.
- Audience – Select the subscribers or segment you want to target.
- Time – Choose when your notification should be sent.
3. Plan your source campaign
Next, plan your source campaign.
Keep in mind that you can send or schedule the first follow-up only after the source campaign’s expiration date.
4. Review your campaign summary
After clicking Plan campaign, you’ll be redirected to the Summary Report for the follow-up campaign you just created.
To view your source campaign report, simply switch to the corresponding tab.

Create a follow-up
You can schedule up to three follow-ups within a single Follow-up campaign.
Each follow-up is possible because PushPushGo automatically collects specific system labels from every campaign sent within the same follow-up campaign:
sys.prev_campaign– identifies users who were sent the campaignsys.prev_delivered_campaign– identifies users who received the campaignsys.prev_clicked_campaign– identifies users who clicked the campaign
These labels are later used to define Audience conditions for your follow-ups, allowing you to target users based on their engagement with previous messages.
When you’re ready to send a follow-up:
1. Go to the Follow-up list in the Campaigns section.

2. Find the campaign you want to follow up on.
3. Click the three dots (⋯) next to the campaign name and select Follow up.

4. The app will ask if you want to copy the content of the source campaign.

5. Adjust the Content of the message if needed.
6. Choose the Audience and the strategy.

7. Fill in the time section and plan your follow-up.
Follow-up report
The Follow-up campaign report is organised into tabs that help you analyze campaign performance and see each campaign details:
- Summary report – Provides an overview of the entire follow-up campaign, including key metrics such as delivery, clicks, and engagement rates.
- Source campaign and follow-ups – Displays detailed information for the source campaign and each follow-up, including the message content (copy) and the audience used in each campaign.

The Summary Report provides an overview of all campaigns included in a follow-up campaign. It consists of the following sections:
- General statistics – Displays cumulative numbers from all campaigns within the follow-up Campaign.
- Details – Shows the campaign name, current status, and the status of the most recent campaign.
- Results – Presents a table with key statistics and engagement metrics for each campaign.
- Reach and engagement – Displays a chart illustrating fluctuations in engagement metrics (such as CTR and DSP) throughout the entire Follow-up campaign.


Thanks to the Results and Reach and engagement sections, you can easily analyze how each campaign performed, compare their effectiveness, and gain valuable insights to improve your overall strategy.
The source campaign and the follow-up details can be found under these tabs.

Follow-up limits
- Each Follow-up campaign allows you to create one source campaign and up to three follow-ups.
- You have 12 days from the moment the source campaign is sent to complete the entire follow-up sequence.
- If you plan to send all three follow-ups, we recommend spacing them approximately three days apart to ensure balanced timing and user engagement.
A new campaign in the sequence can be sent only after the previous campaign has expired.
Follow-up list
You can access the Follow-up list by opening the Campaigns section and switching to the Follow-up tab.

On this list, you’ll find all Follow-up campaigns that have been created in your project.

Each campaign has its name, status and last campaign status.

From the Follow-up list, you can either create a follow-up for an existing campaign or view its report.
The follow-up action is available only when the campaign status is “In progress.”
RSS campaign
Create RSS campaig
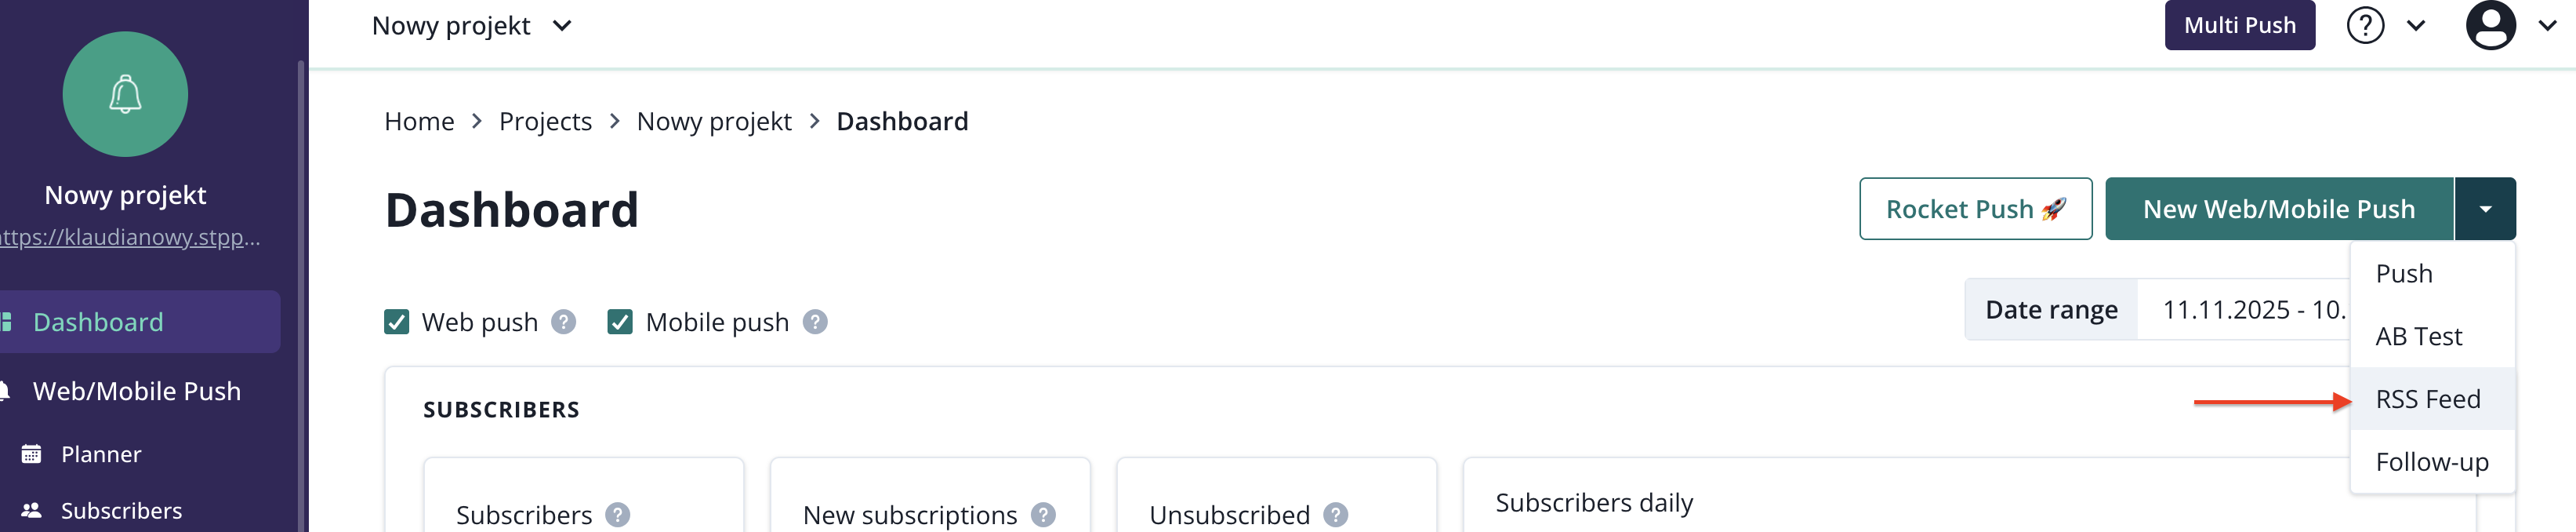
To create and send a new RSS campaign, click on the arrow next to the "New campaign" button and select the "RSS campaign" option from the list.

The first step is to name your RSS campaign (this name is visible only to the PushPushGo panel user). Next, in the 'Feed URL' field, enter the link to the feed you intend to integrate.
The creator includes three optional fields to fill in: - Default link - It replaces the campaign link only if, for some reason, the campaign cannot be sent with the post link from the feed. - Override title - The content entered in this field will replace the text fetched from the feed during the campaign creation. - Override message - The content entered in this field will replace the text in the 'message' field fetched from the feed during the campaign creation.
Audience
An RSS campaign can be sent to all subscribers or targeted to a previously prepared segment. There is no option for targeting by Labels here.

Enable RSS campaig
Once your RSS campaign is created, you can save it as a draft or proceed with it by clicking the ‘Create RSS campaign’ button.
Next, a window will appear with the options "Create and enable," "Only create," and "Cancel." Clicking on "Create and enable" will save and immediately activate the RSS campaign. Clicking on "Only create" will simply save the campaign. Its activation can be done at any time later. If you choose the "Cancel" option, you will return to editing the RSS campaign.

RSS campaign report
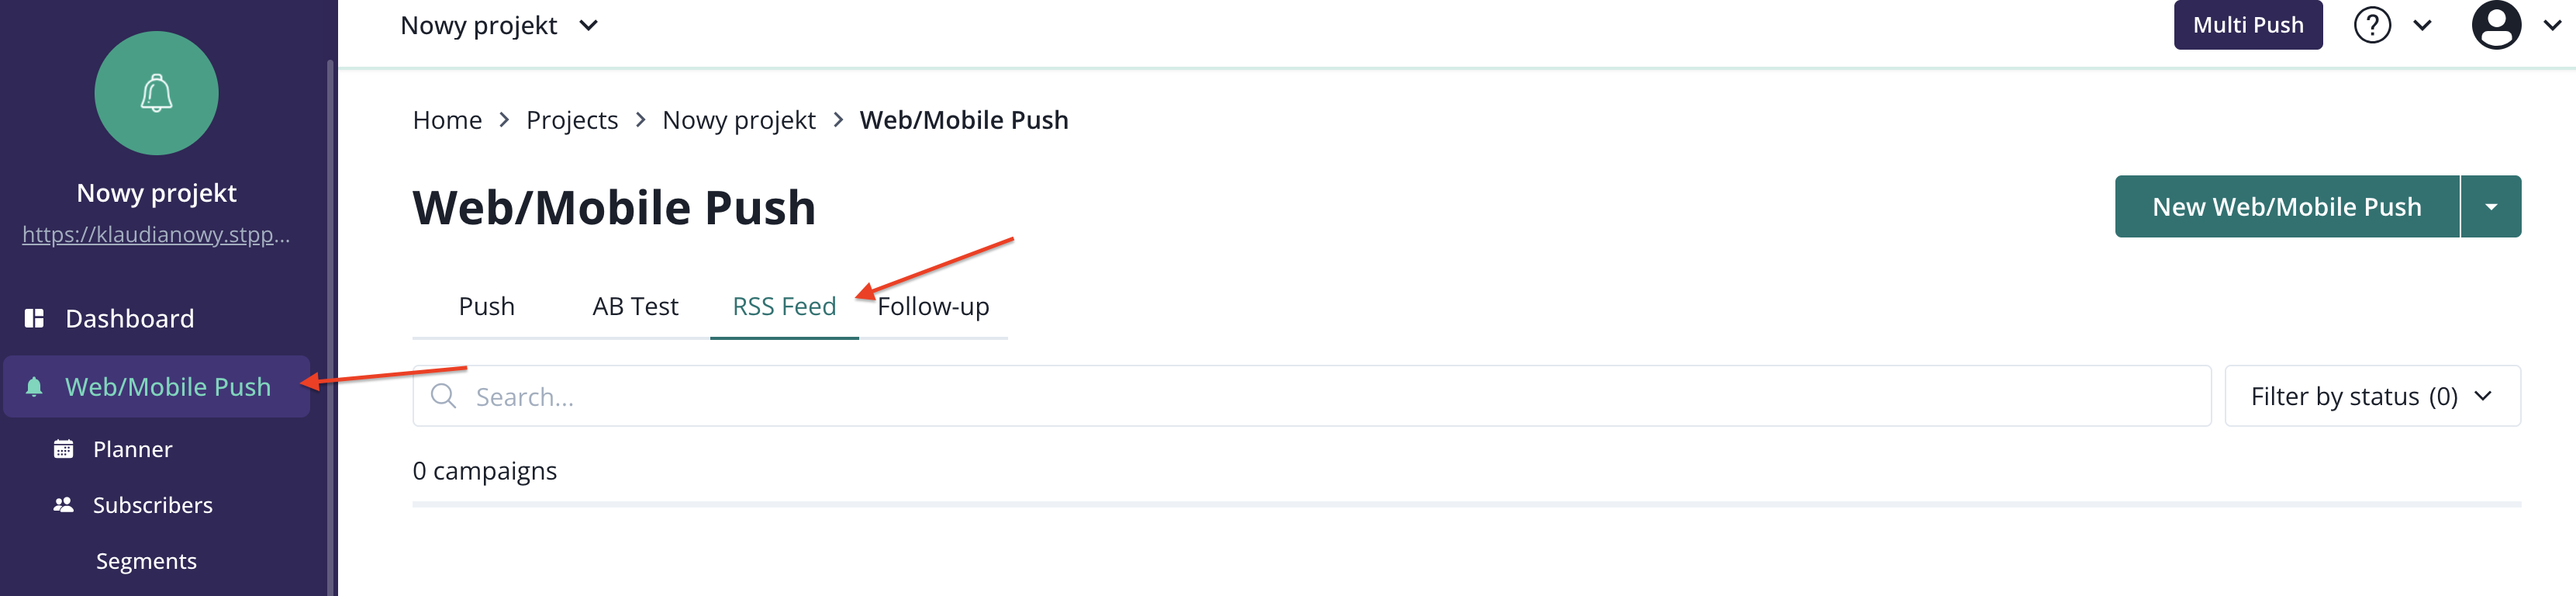
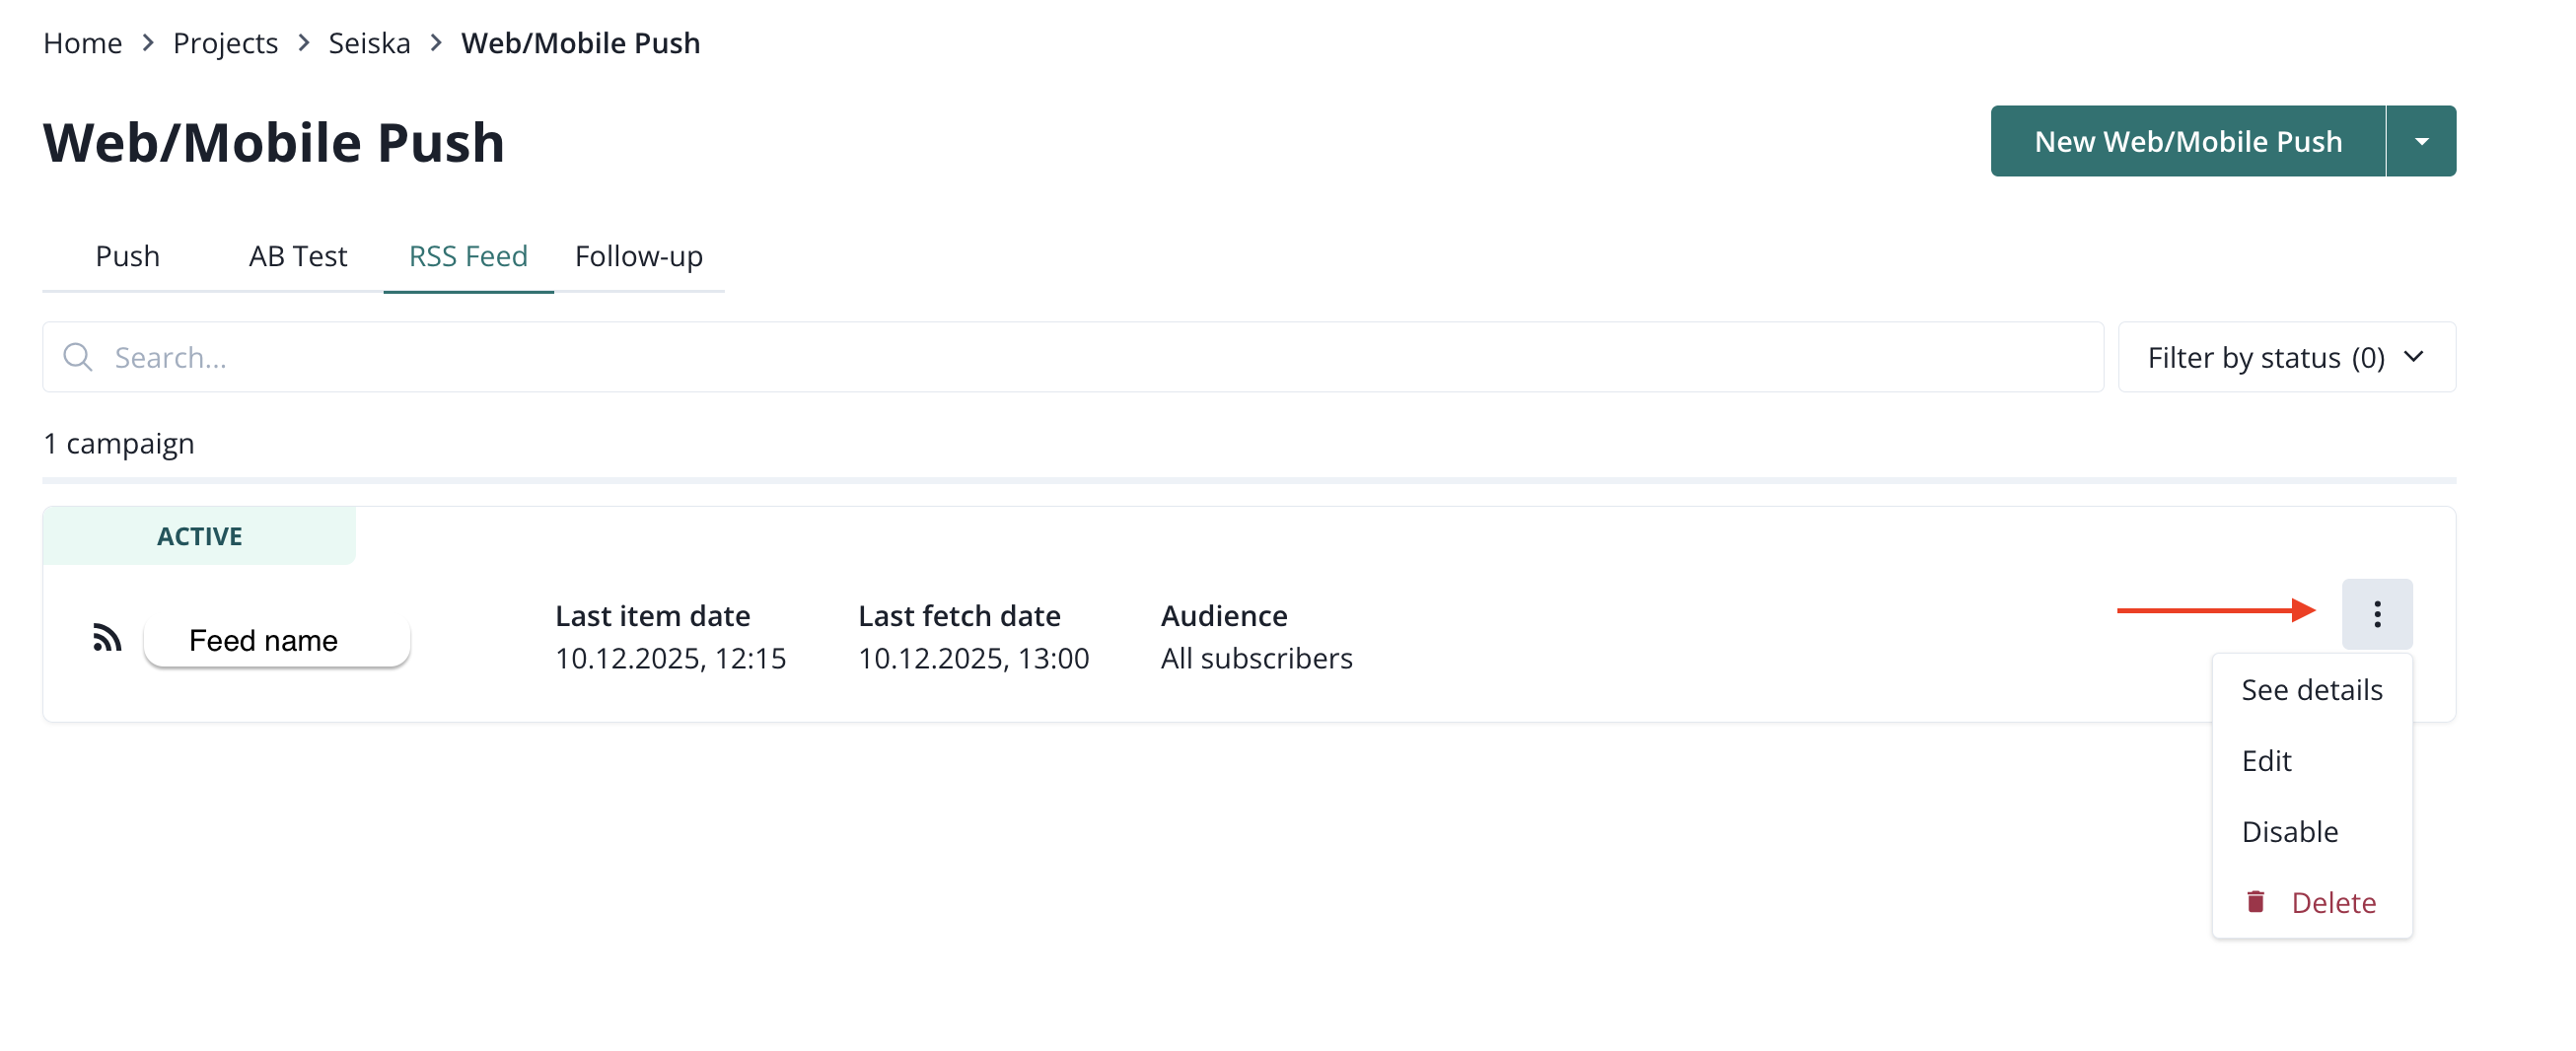
The created RSS campaign can be found in the Campaigns > RSS feed.
After clicking the three dots on the right side, you will see the options available for your campaign:
- see details
- edit
- disable
- delete
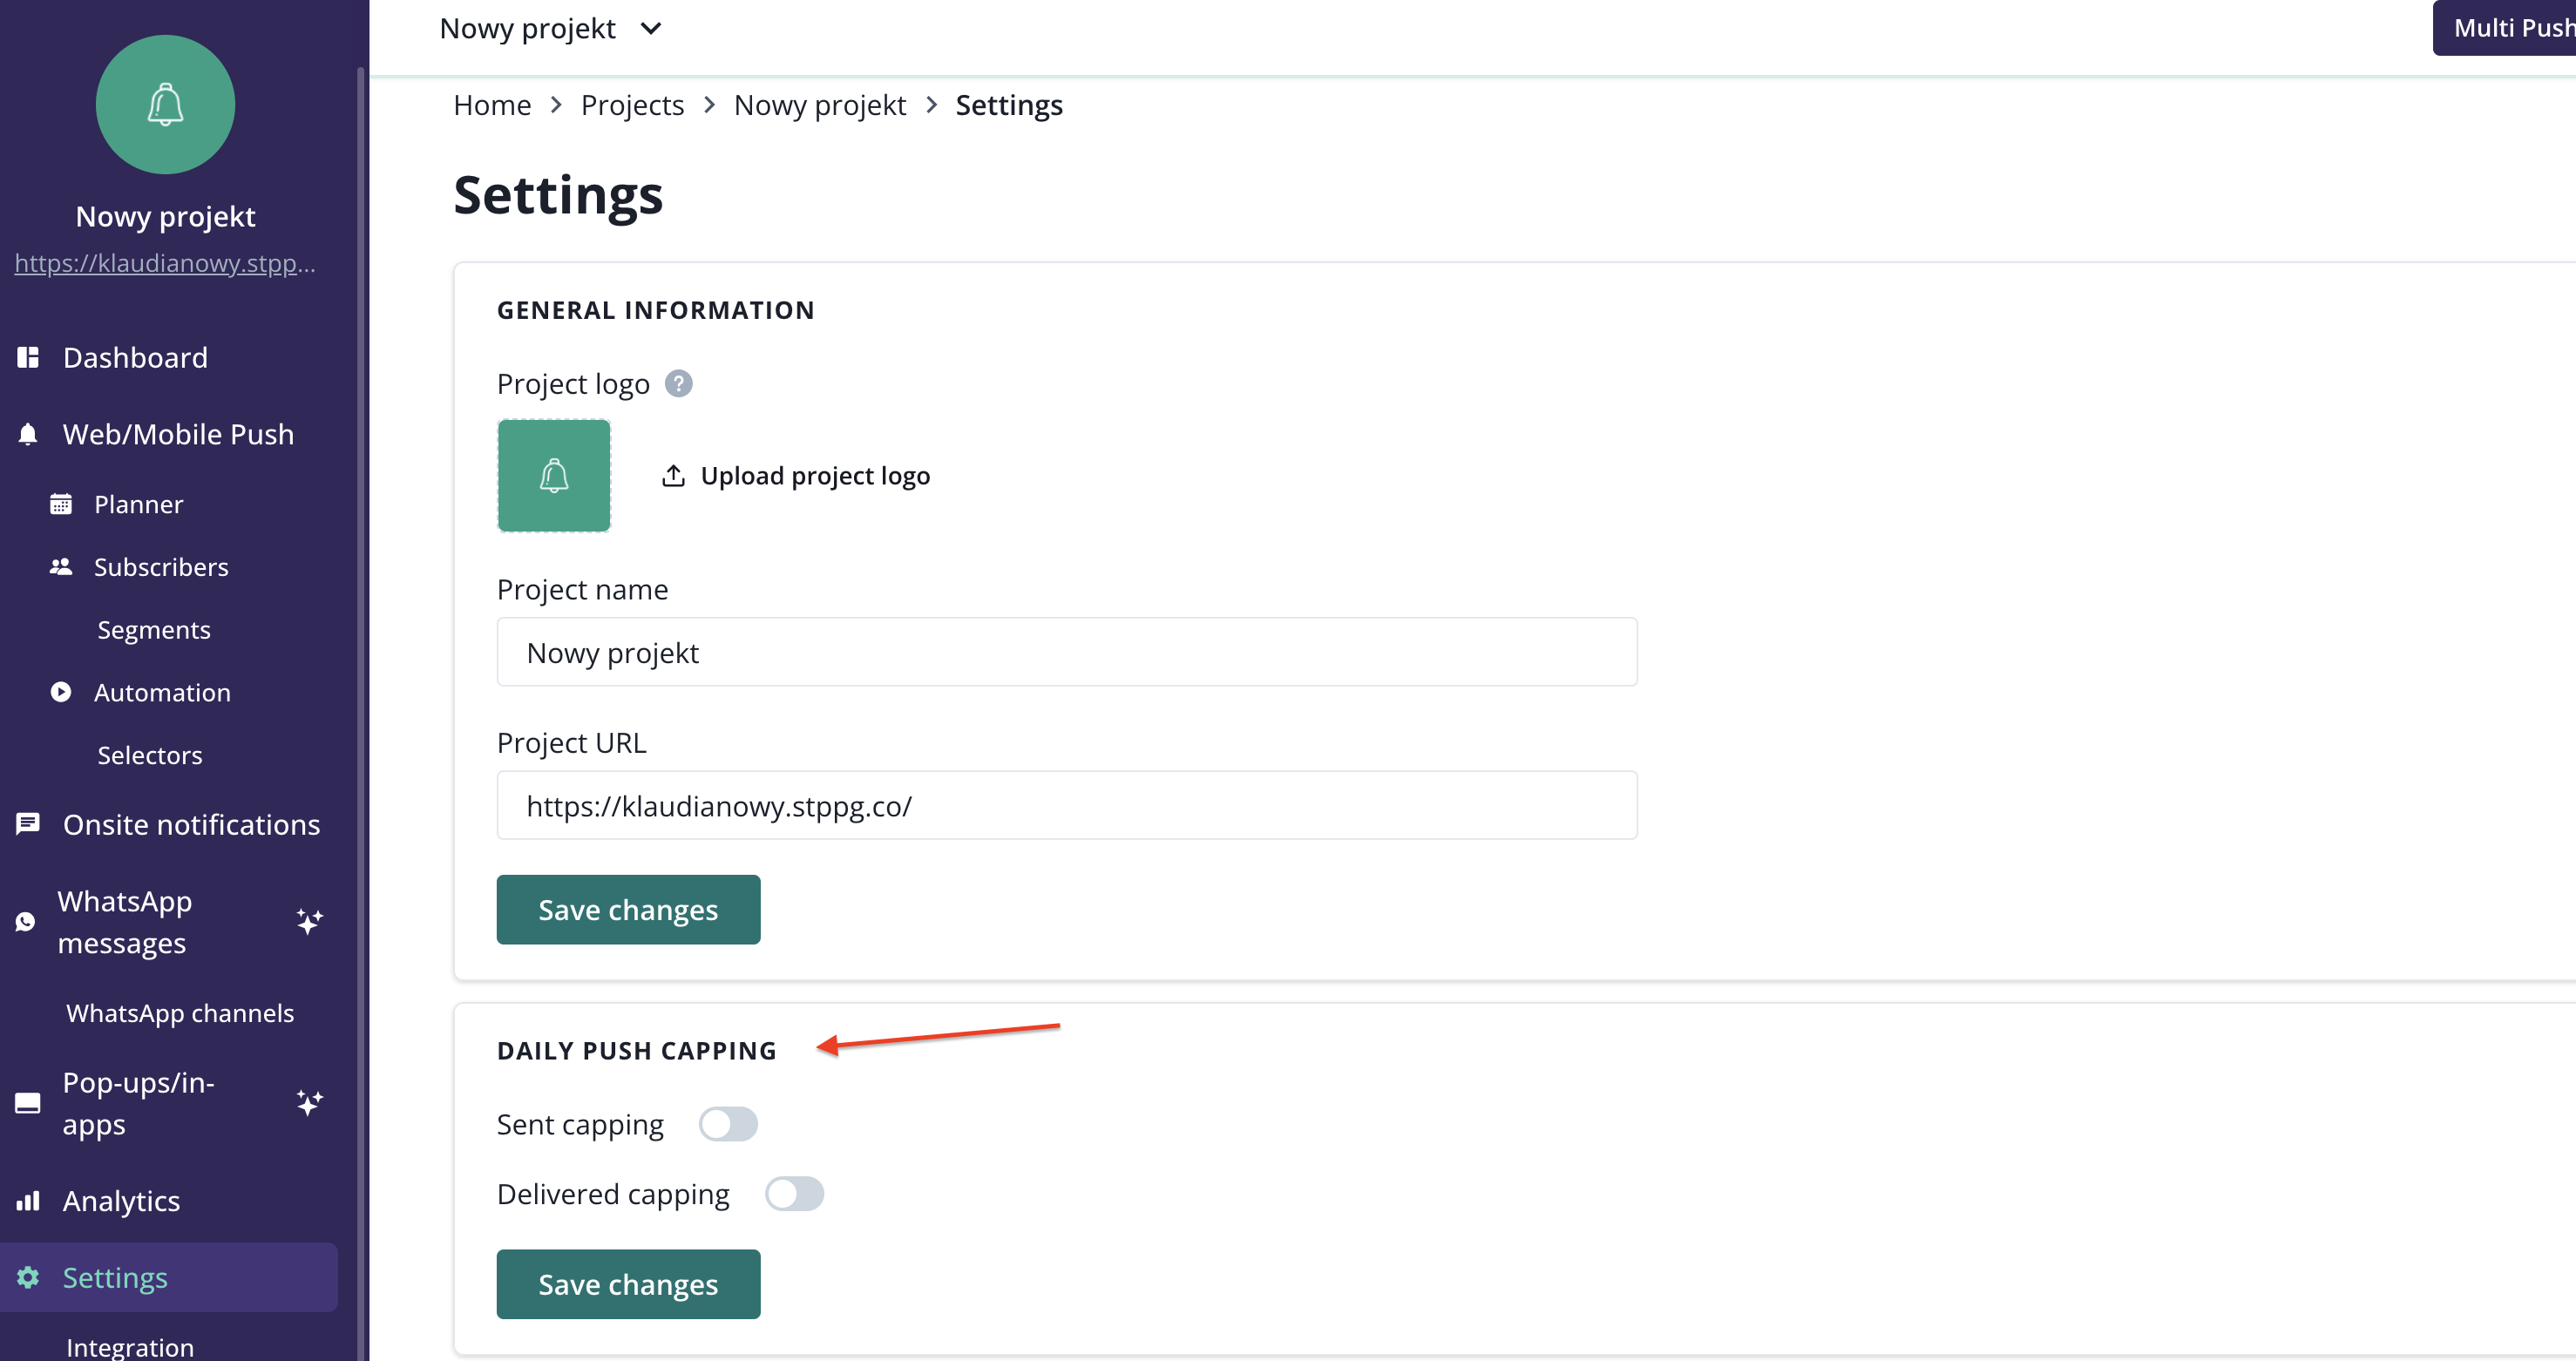
Daily push capping
Daily Push Capping is designed to prevent over-messaging subscribers. The ones who have reached the daily number of sent or delivered notifications won’t be getting new pushes on the given day.
The tool is based on sent and delivered statistics per subscriber daily. When subscribers reach their daily limit, they won’t see any new notifications. You can easily set it up in the Project Settings menu of the PushPushGo application.
We’ve also added Omit Capping option, allowing you to skip the Daily Push Capping limitations. It can be used if you need to send a notification to all subscribers, even if they have already reached their capping limit. The option is available at the bottom of the Audience step of Push and AB test creator.

The capping feature is available as an additional tool for our enterprise clients. Contact our team to learn more about the implementation - support@pushpushgo.com
Rocket push Chrome extension
If you run a news portal and are even more concerned about the speed of creating and sending notifications then we have a PushPushGo plugin for Chrome browser for you. You can download it here. How does it work?
Download our plugin and add it to your extensions bar. Go to any article on your site and click on the PushPushGo plugin icon. All the data for the notification will be automatically extracted from the article's metadata.

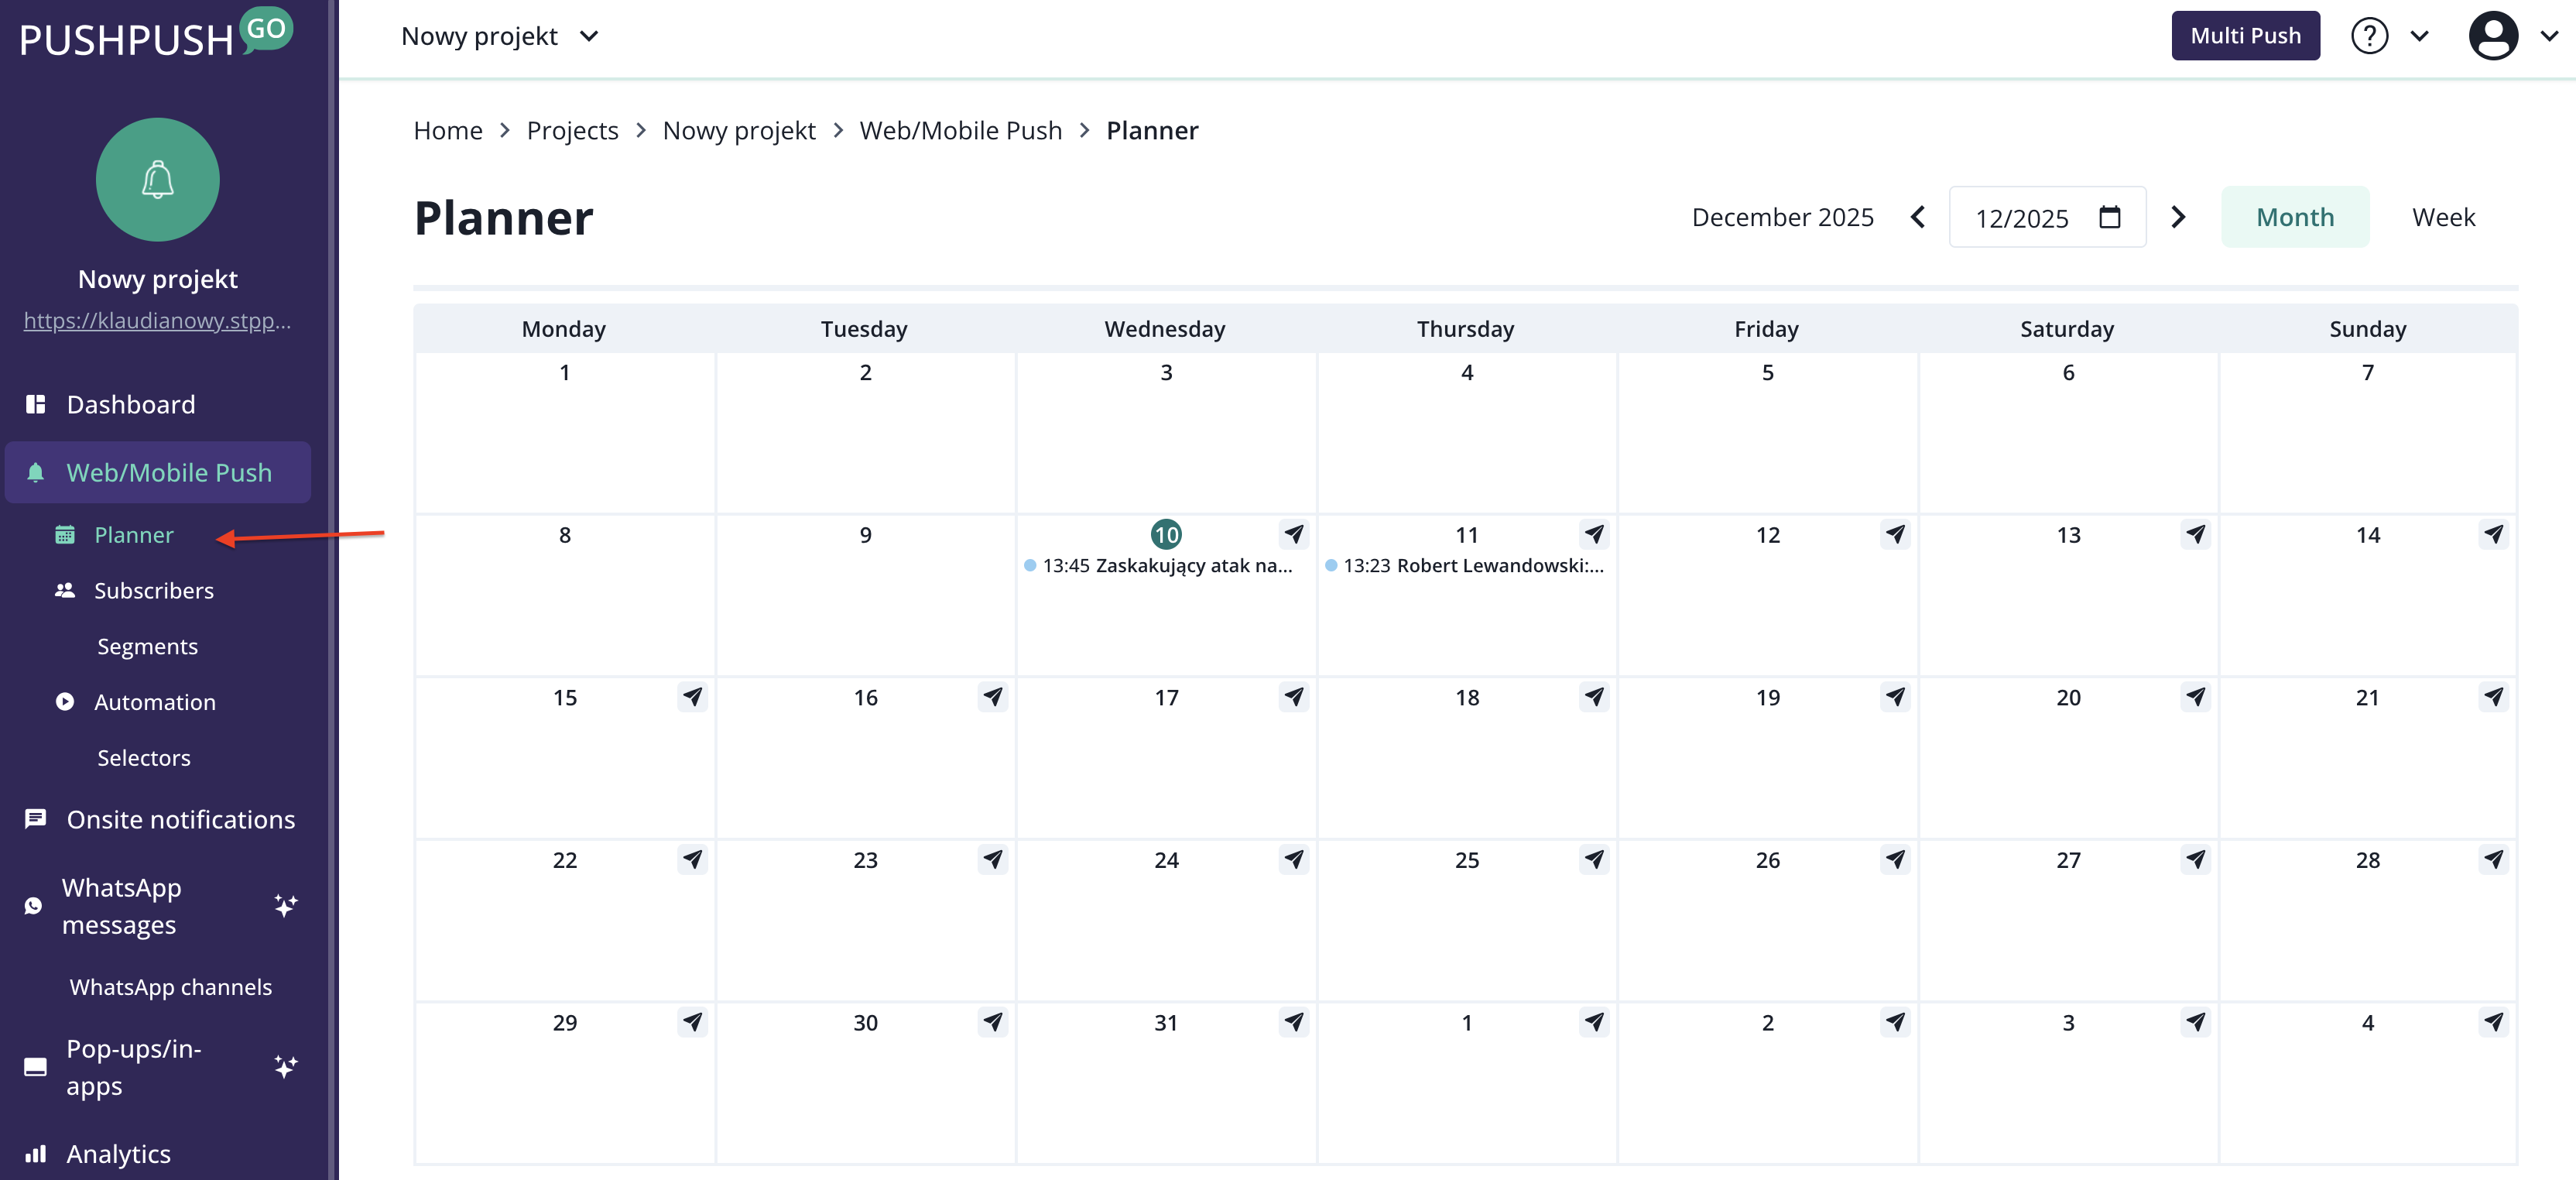
Push campaigns planner
Planner allows you to easily manage your campaigns. It provides information about which campaigns were sent on specific days and about scheduled campaigns.
If you want to schedule a campaign for a specific day, simply click the button 'Plan campaign' on the chosen day, and you will be redirected to the campaign creator. The sending date will already be set in the creator.
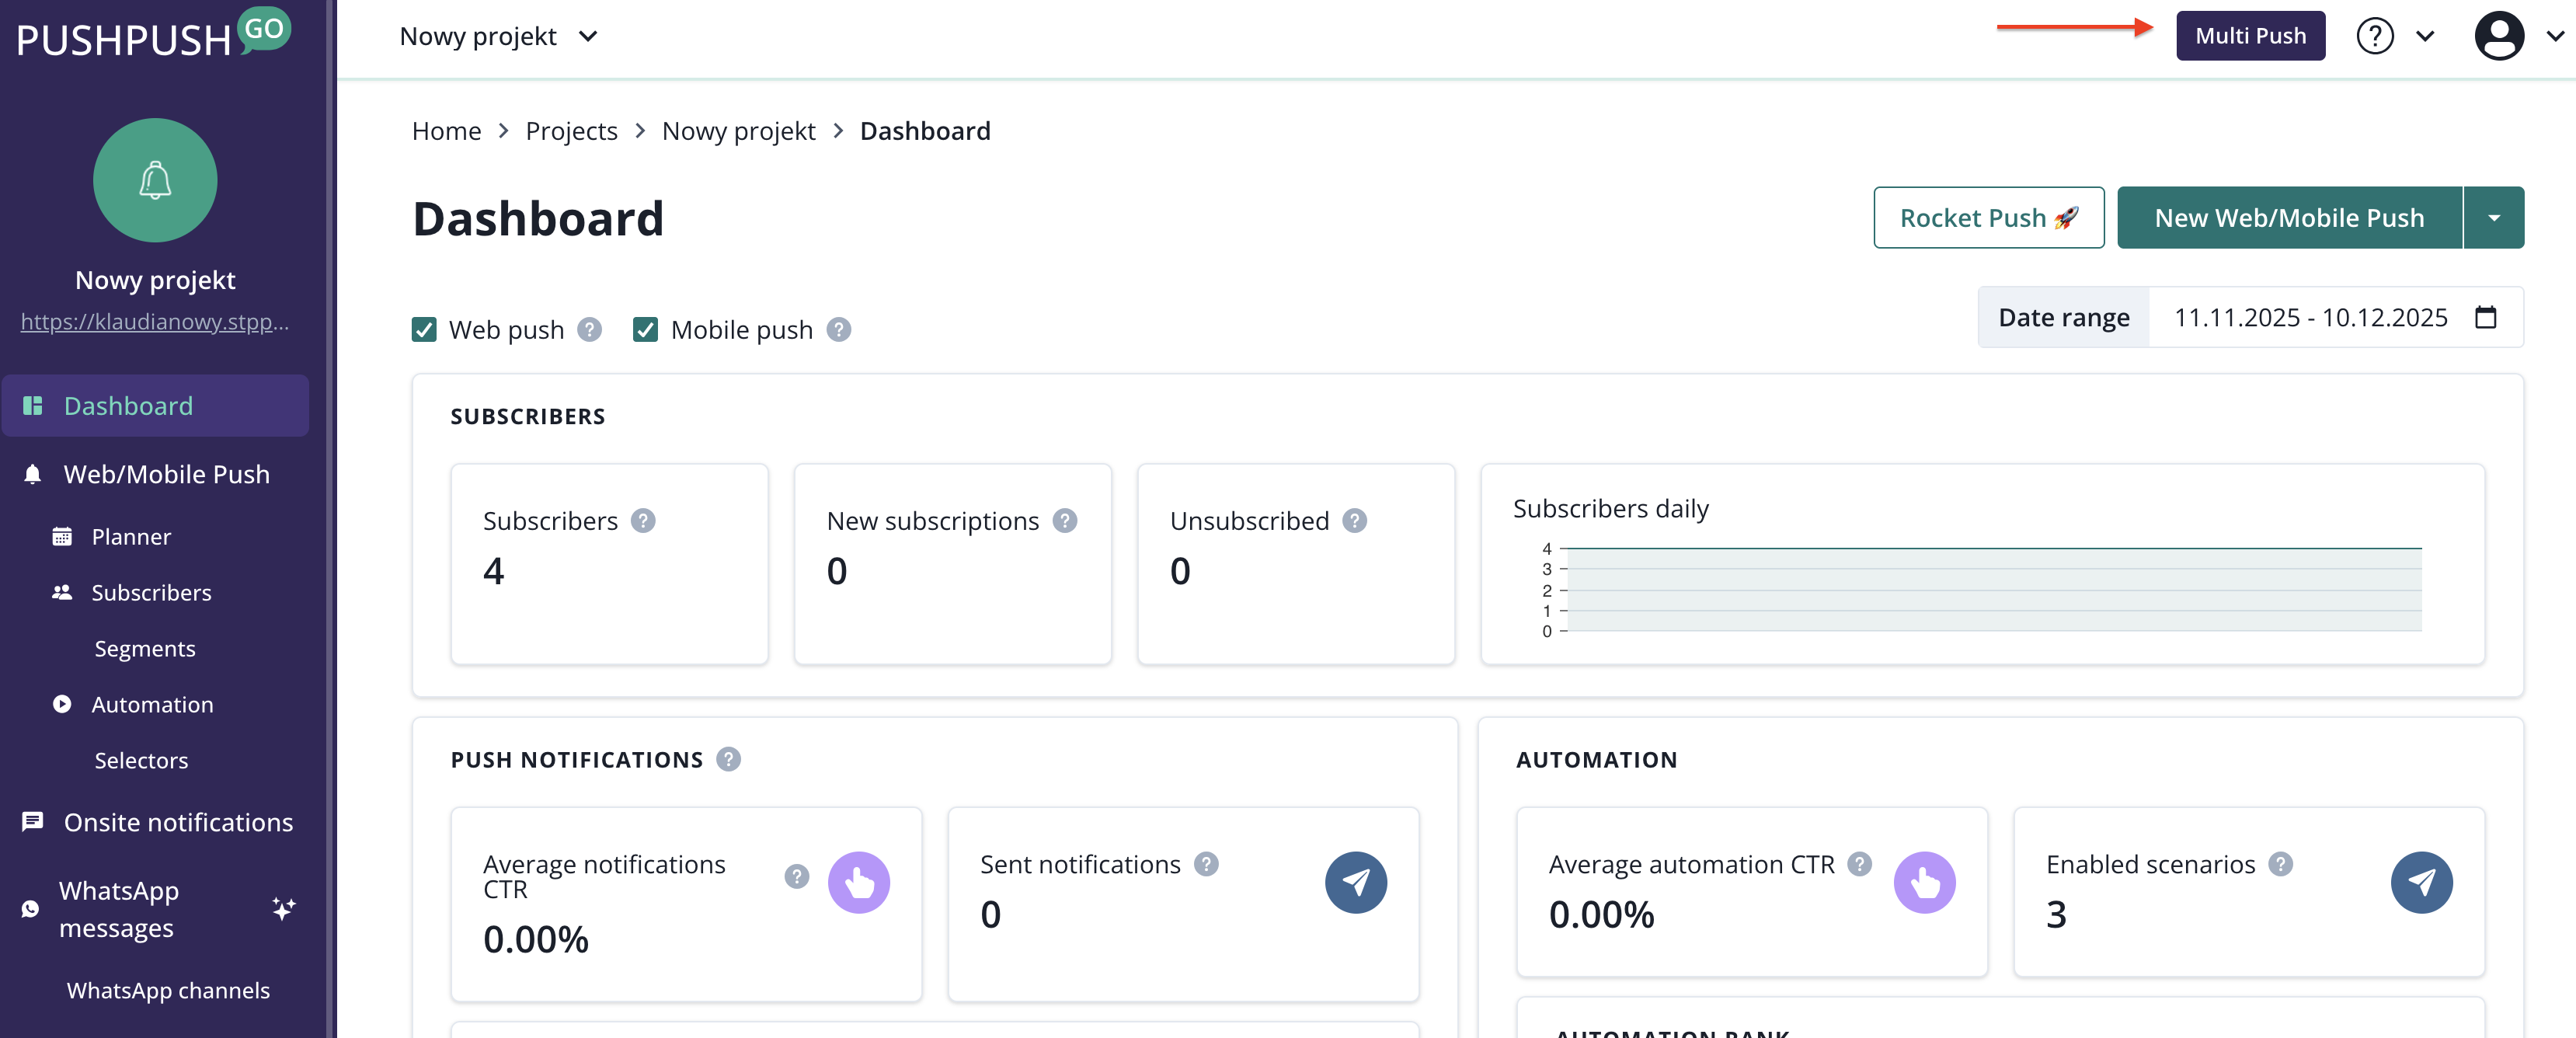
Multipush
Multi Push is designed for organizations who manage push notifications across many projects. This development means that if you allow push notifications on multiple websites, you can now communicate with subscribers on all of them - or a selected number of them.
Multi Push can come in handy if:
- you're a publisher running separate websites for local editions of your portal or a magazine
- you run multiple business projects with separate websites
- you offer web and mobile push notifications to your clients.
The button for the Multi Push creator is located in the top-right corner of the main Dashboard.
The first step in creating a Multi Push is selecting the projects for the campaign. Choose the projects you want to target with Multi Push and click "Continue". You can use the option 'Select all'.

Add all the necessary elements of push notification: URL, title, content, action buttons, etc. A Multi Push can only be sent to all subscribers. This creator does not have the option to target by segments or labels.
After filling in the notification content go to summary by clicking a button on the bottom of the creator.

Click "Send all" to dispatch your push notification to all selected projects.

FAQ
Why my campaign has low deliverability (DSP)?
If the percentage of delivered campaigns is at the level of 50-60%, nothing terrible is happening. Subscribers often sign up on several browsers, when in practice they use only one. Then such a recipient is pending until he or she turns on the browser he or she signed up for.
Lower deliverability may be due to:
- blocking notifications within the operating system - this applies to both desktop and mobile devices. In this case, the subscriber does not unsubscribe from notifications, but cannot receive them until they are unblocked
- the expiration date of the notification - the shorter, the less chance that all subscribers will receive the notification
However, if the percentage of delivered campaigns oscillates between 0-20%, and the situation described in point B does not occur, then it is worth analyzing the integration once again, if it was done correctly.
To do so, check that:
- the exact same script that was generated for this project was pasted into the page,
- the exact same sw.js that was generated for this project was pasted into the server root path,
- the website does not contain additional scripts or service workers (service worker.js, sw.js etc.) belonging to another provider.
Why did my campaign caused so many unsubscriptions?
This is due to the limitations of the web push technology itself. Recipients can unsubscribe at any time. However, we are able to report that someone has unsubscribed from them and how many total unsubscribes there were since the last such notification only at the time of dispatch.